To protect Microsoft Hyper-V VMs, choose settings such as access node and backup plan, select the VMs to protect, and then validate the configuration with a small restore test.
Backup configuration
Start the configuration
-
From the Command Center navigation pane, go to Explore > Service catalog.
-
On the Virtual machines tile, click Configure.
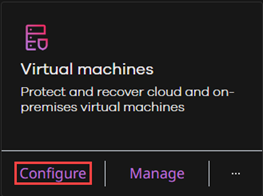
-
Click Microsoft Hyper-V.
Infrastructure page
-
For Select MediaAgent, if your environment has multiple MediaAgents or requires traffic to flow through a specific network gateway, select the MediaAgent to use for Hyper-V node discovery. Otherwise, leave the default.
-
Click Next.
Add hypervisor page
-
For Hypervisor display name, enter a name for the hypervisor.
-
For Hypervisor host name, enter the FQDN or IP address of the Hyper-V server or cluster.
-
For Credential, select or create credentials with the username and password of the account you configured in Configure permissions for Microsoft Hyper-V VMs.
-
For Hyper-V nodes, select Automatic, or manually select a client that can communicate with the specified Hyper-V host, then click Discover nodes.
The list shows the access nodes that are discovered for the Hyper-V host.
If the Commvault package is not installed on the Hyper-V host, the list is empty. To deploy an access node, click the add button, download and install the Commvault package on the Hyper-V host, and then click Discover nodes to refresh the access node list.
For more information about deploying access nodes, see Prepare your Microsoft Hyper-V environment for protection.
Add VM group page
A VM group is a set of VMs that share the same backup frequency, retention, and storage settings, as defined in the backup plan.
After you complete these steps, you can create additional VM groups for the same hypervisor to apply different backup plans or to organize VMs by workload.
-
Select the VMs to include in the VM group.
In most environments, use rules to dynamically select VMs. You can also select VMs directly. For more information, see Configuring VM groups, sets of VMs to back up with the same settings.
Plan page
-
Select a backup plan.
For information about backup plans, including steps to create them, see Understand and create backup plans.
-
Click Submit.
Validation
Verify the configuration
Confirm the following:
-
The Hyper-V host appears in the list of configured hypervisors.
If not, see Hyper-V Host Cannot Be Added or Discovered in Commvault.
-
The VM group contains the expected VMs.
-
The backup plan is associated with the VM group.
Run a backup
Run a backup for the VM group you created to confirm that backups work correctly.
You can also test backups for some individual VMs.
-
From the Command Center navigation pane, go to Protect > Virtual machines.
-
Click the VM group.
-
Click Back up.
-
Select Incremental or Full, and then click Run.
Confirm that the backup completed successfully
-
From the Command Center navigation pane, go to Monitor > Jobs.
-
Locate the backup job for the VM group.
-
Confirm that the job status is Completed.
If the job fails, review the error details. Common causes include permission issues, network connectivity problems, and snapshot failures in the Microsoft Hyper-V environment.
Test a restore
To confirm you can restore data, perform a simple file restore.
-
From the Command Center navigation pane, go to Protect > Virtual machines.
-
Click the VM group, and then click a VM.
-
In the Recovery points tile, select a recent backup.
-
Click Restore.
-
Select Guest files, and then restore a small file or folder.
-
Verify that the restored data is accessible.