How do I enable SnapDiff V2 or SnapDiff V3 for Snapshot Cataloging or Backup Copy?
Configuration Requirements for SnapDiff V2
-
Verify RPC is enabled on the vServer being cataloged or backup copied. Even if a cluster client is being cataloged, the vServer for the volume being cataloged or backup copied must have RPC enabled. On the file server, verify RPC is enabled on the vServer using the following commands:
set advancedvserver snapdiff-rpc-server show -vserver <vserver>vserver snapdiff-rpc-server on -vserver <vserver> -
Verify whether an NFS interface exists between the vServer and the Commvault MediaAgent. Specifically, confirm that there exists a vServer NFS interface on the file server node containing the volume being cataloged using the following commands:
vserver nfs show -vserver <vserver>network interface show -vserver <vserver> -data-protocol nfs
Configuration Requirements for SnapDiff V3
-
Verify RPC is enabled on the vServer being cataloged or backup copied. Even if a cluster client is being cataloged, the vServer for the volume being cataloged or backup copied must have RPC enabled. On the file server, verify RPC is enabled on the vServer using the following commands:
set advancedvserver snapdiff-rpc-server show -vserver <vserver>vserver snapdiff-rpc-server on -vserver <vserver> -
Verify whether an NFS interface exists between the vServer and the Commvault MediaAgent. Specifically, confirm that there exists a vServer NFS interface on the file server node containing the volume being cataloged using the following commands:
vserver nfs show -vserver <vserver>network interface show -vserver <vserver> -data-protocol nfs -
Verify that the cluster array login is authorized for REST, HTTP, and SSL. For more information on setting up a NetApp cluster login.
-
To enable REST API based authorization to the cluster array, run the following commands:
vserver services web access show -vserver <vserver> -name rest -role <role>vserver services web access create -vserver <vserver > -name rest -role <role> -
To enable HTTP and SSH based authorization to the cluster array, run the following commands:
security login show -vserver <vserver> -user-or-group-name <user> -application httpsecurity login create -vserver <vserver> -user-or-group-name IntelliSnapUser -application http -authentication-method password -role <role>security login show -vserver <vserver> -user-or-group-name <user> -application sshsecurity login create -vserver <vserver> -user-or-group-name IntelliSnapUser -application ssh -authentication-method password -role <role> -
To enable the SnapDiff and license APIs for the cluster array, run the following commands:
security login role show -vserver <vserver> -role <role> -cmddirname "snapdiff"security login role create -vserver <vserver> -role <role> -cmddirname "snapdiff" -access allsecurity login role show -vserver <vserver> -role <role> -cmddirname "license"security login role create -vserver <vserver> -role <role> -cmddirname "license" -access all
-
Note
-
For SnapDiff V3, the array management entries for the vServer must have tunneling to the selected cluster. SnapDiff V3 requires security key authentication that is supported only on the cluster interface.
-
NDMP IntelliSnap cataloging using SnapDiff V2/V3 cannot be run on non-Linux MediaAgents. SnapDiff V2 and V3 are supported only for Linux and Windows MediaAgents.
Can I create additional provisioning policies for secondary copies and use them for IntelliSnap?
Yes, you can create additional provisioning policies for secondary copies for the OnCommand Unified Manager. The IntelliSnap feature can use provisioning policies prefixed by “SnapProtect_” (case insensitive) in storage policy copies.
Can I use a non-root user to configure an array or NDMP?
You can use a non-root user for array configuration and NDMP configurations.
7-Mode
For the 7-Mode system, configure the array with a non-root user with the following commands:
-
To create IntelliSnap role with proper rights:
NetApp1> useradmin role add IntelliSnaprole -c ”[ IntelliSnap Management Role]" -a login-ndmp,login-http-admin,api-*
Example:
NetApp1> useradmin role add IntelliSnaprole -c ”SP Mgmt Role" -a login-ndmp,login-http-admin,api-*
-
To add a role to the newly created IntelliSnap group:
NetApp1> useradmin group add IntelliSnapgroup -c ”[ IntelliSnap Management Group]" –r IntelliSnaprole
Example:
NetApp1> useradmin group add IntelliSnapgroup -c ”SP Mgmt Group" –r IntelliSnaprole
-
To create a user for the array credential in the Commvault Control Panel.
NetApp1> useradmin user add IntelliSnapuser -c ”[ IntelliSnap Management Account]" -n ”S Admin" –g IntelliSnapgroup
Example:
NetApp1> useradmin user add IntelliSnapuser -c ”SP Mgmt Account" -n ”S Admin" –g IntelliSnapgroup
-
To configure NDMP with the same credentials, follow the steps below:
-
Retrieve the encrypted password for the IntelliSnapuser that you added in the previous commands with the following command.
NetApp1> ndmpd password IntelliSnapuser
-
In the NDMP Server Properties dialog box, in the NDMP Login and NDMP Password boxes, type the IntelliSnapuser and password.
-
C-Mode
For the C-Mode system, to configure the array with a non-root user, type the following commands on the cluster Vserver only:
security login role create -vserver <vserver_name> -role IntelliSnapRole -cmddirname "metrocluster vserver show" -access readonly
security login role create -vserver <vserver_name> -role IntelliSnapRole -cmddirname "metrocluster show" -access all
security login role create -vserver <vserver_name> -role IntelliSnapRole -cmddirname "fcp portname" -access readonly
security login role create -vserver <vserver_name> -role IntelliSnapRole -cmddirname "vserver fcp show" -access readonly
security login role create -vserver <vserver_name> -role IntelliSnapRole -cmddirname "storage aggregate show" -access readonly
security login role create -vserver <vserver_name> -role IntelliSnapRole -cmddirname "vserver show" -access readonly
security login role create -vserver <vserver_name> -role IntelliSnapRole -cmddirname "license" -access allsecurity login role create -vserver <vserver_name> -role IntelliSnapRole -cmddirname "snapdiff" -access allsecurity login unlock -username IntelliSnapUser -vserver <vserver_name>Type the following commands on all Vservers:
security login role create -vserver <vserver_name> -role IntelliSnapRole -cmddirname "vserver" -access readonly
security login role create -vserver <vserver_name> -role IntelliSnapRole -cmddirname "job show" -access all
security login role create -vserver <vserver_name> -role IntelliSnapRole -cmddirname "lun" -access all
security login role create -vserver <vserver_name> -role IntelliSnapRole -cmddirname "network interface" -access readonly
security login role create -vserver <vserver_name> -role IntelliSnapRole -cmddirname "snapmirror" -access all
security login role create -vserver <vserver_name> -role IntelliSnapRole -cmddirname "version" -access all
security login role create -vserver <vserver_name> -role IntelliSnapRole -cmddirname "volume" -access all
security login role create -vserver <vserver_name> -role IntelliSnapRole -cmddirname "volume efficiency" -access none
security login role create -vserver <vserver_name> -role IntelliSnapRole -cmddirname "volume move" -access none
security login role create -vserver <vserver_name> -role IntelliSnapRole -cmddirname "vserver cifs" -access all
security login role create -vserver <vserver_name> -role IntelliSnapRole -cmddirname "vserver export-policy" -access all
security login role create -vserver <vserver_name> -role IntelliSnapRole -cmddirname "vserver fcp" -access all
security login role create -vserver <vserver_name> -role IntelliSnapRole -cmddirname "vserver fpolicy" -access all
security login role create -vserver <vserver_name> -role IntelliSnapRole -cmddirname "vserver iscsi" -access all
security login role create -vserver <vserver_name> -role IntelliSnapRole -cmddirname "vserver nfs" -access all
security login role create -vserver <vserver_name> -role IntelliSnapRole -cmddirname "vserver services ndmp" -access all
security login create -user-or-group-name IntelliSnapUser -application ontapi -authmethod password -role IntelliSnapRole -vserver <vserver_name>
security login create -user-or-group-name IntelliSnapUser -application ssh -authmethod password -role IntelliSnapRole -vserver <vserver_name>
security login create -vserver <vserver_name> -user-or-group-name IntelliSnapUser -application http -authentication-method password -role IntelliSnapRolevserver services web access create -vserver <vserver_name> -name rest -role IntelliSnapRolesecurity login unlock -username IntelliSnapUser -vserver <vserver_name>What account types and roles should I set for the Cluster Mode operating system?
Add a user in the Array Management credentials with ontapi and ssh roles. Add the cluster in Array Management and then SVMs are detected and added from the cluster client.
For more information on the configuration of NetApp clusters, see Configuring Storage Virtual Machines on NetApp Arrays.
How do I verify that the destination filer has SnapMirror access to the source filer?
To ensure that SnapMirror jobs run, the destination filer must have SnapMirror access to the source filer. If the name or IP address of the SnapMirror filer appears in "/etc/snapmirror.allow", then the destination filer has access.
For more information on SnapMirror options, refer to the NetApp Support documentation - SnapMirror options.
Alternatively, you can go into each of the hosts in OnCommand Unified Manager and configure the proper security rights for source and destination in the Fabric-Attached Storage settings.
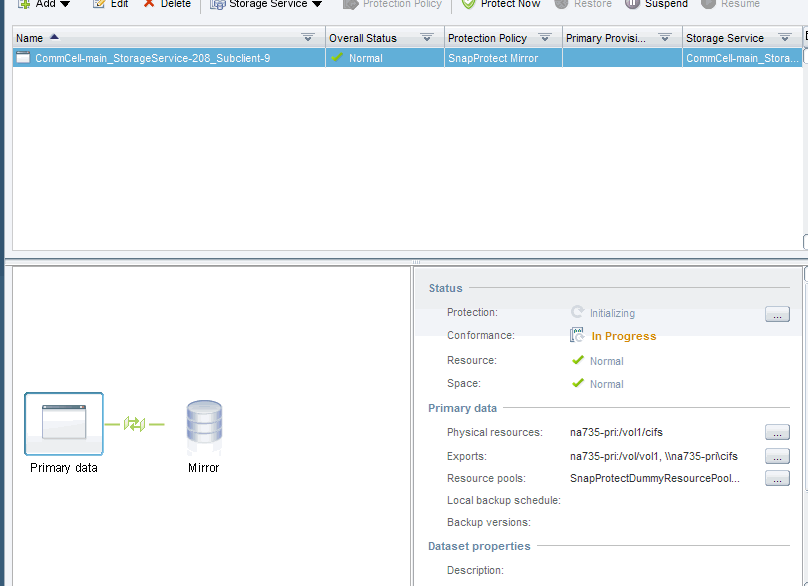
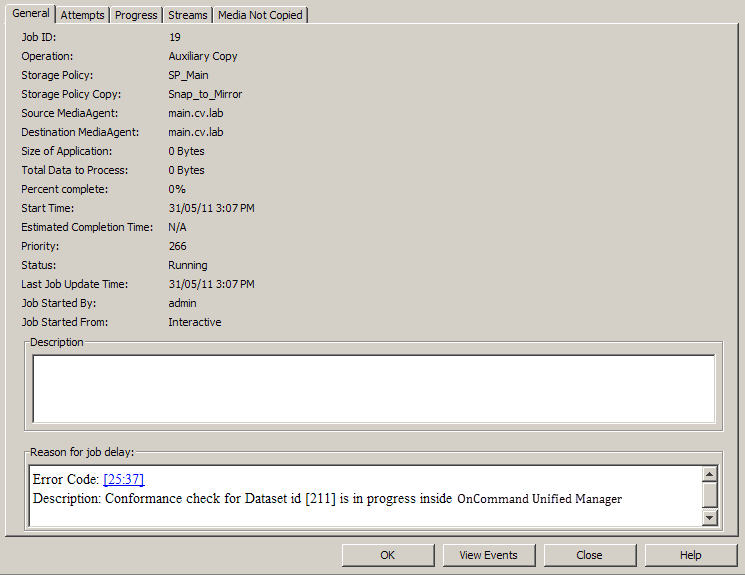
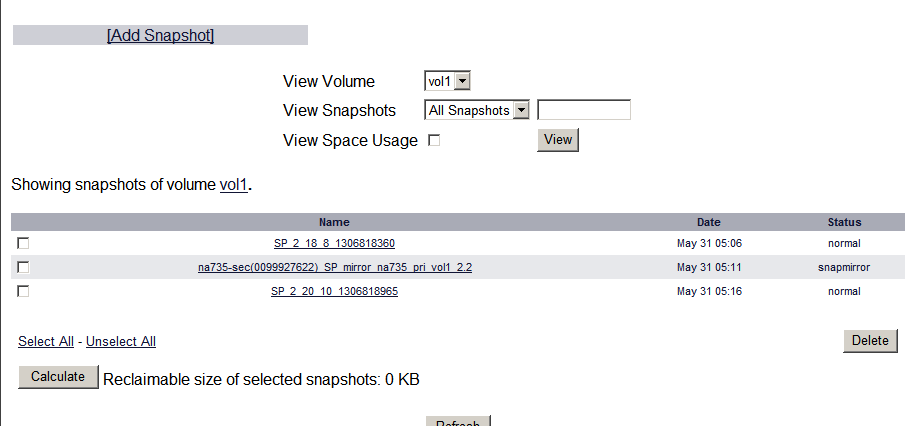
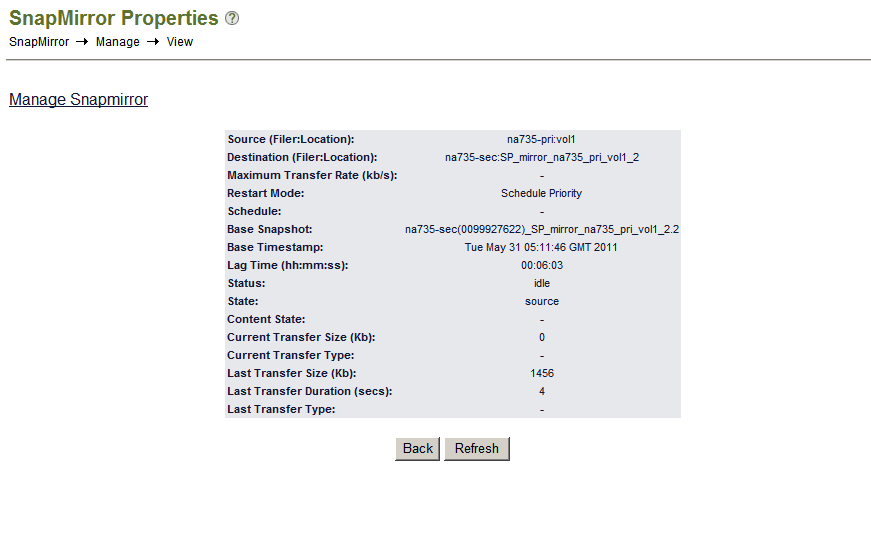
How does the SnapMirror process work?
-
To get the full, detailed Snap Management plan so that SnapMirror/SnapVault can run, NetApp runs a conformation check during the first auxiliary copy job.
-
On NetApp
-
On Commvault
-
-
During each SnapMirror auxiliary copy job, SnapMirror creates a “BackupVersion," which is a new Snapshot of the entire volume that requires replication.

-
Once a new Snapshot for SnapMirror is available, the Snapshot is listed under the volume on the Primary Filer.
-
The new Snapshot also appears in the current SnapMirror session.
-
On the destination filer site, the same Snapshot appears. In addition, if there were any previous SnapMirror on-demand jobs run, only the very last one remains on the target box.
NetApp calls this a “Swizzling Process”. That is, the primary Fabric-Attached Storage (FAS) creates a delta set between the original snapshot used from the previous SnapMirror job and the new snapshot created for the current SnapMirror job. Only the details of the snapshot and the deltas are sent to the destination FAS, and refer to the previous snapshot, which was formerly the target SnapMirror session. The volume is updated to match what is in the primary FAS. The previous snapshot is not deleted because the entire process is a background job.
How does data aging work with SnapMirror?
In Commvault, if an IntelliSnap job on a storage policy copy with SnapMirror capabilities is data-aged, the job is removed from the snapshots list. For information on viewing the snapshots for an agent, or snapshot copy, see List Snapshots.
The data-aging process does not physically delete the snapshot taken by the IntelliSnap job from the SnapMirror volume on the file server. Snapshots from jobs that have been data-aged are physically deleted only when you perform an auxiliary copy to the SnapMirror node.
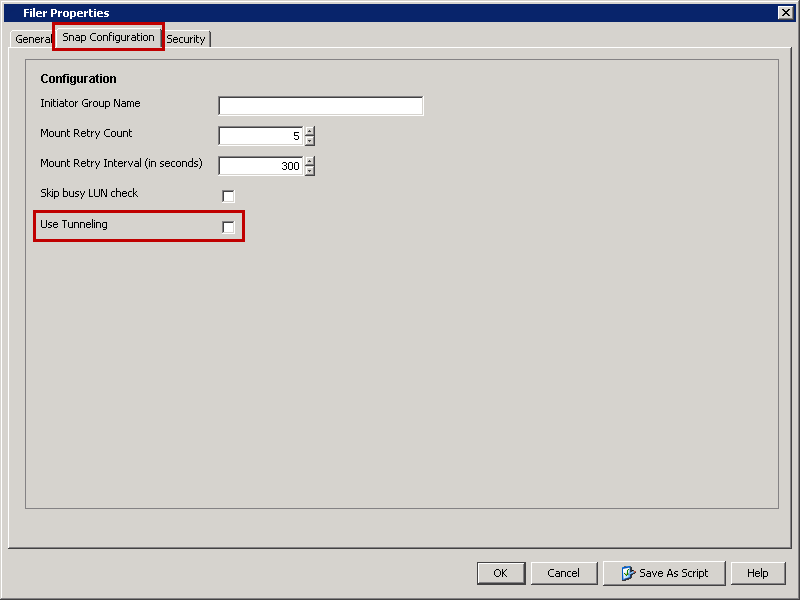
Can I disable tunneling for a storage virtual machine?
Yes. If you want to disassociate a particular Storage Virtual Machine from a NetApp array, then you can turn off the tunneling option.
All jobs scheduled through the array no longer run for the disassociated Storage Virtual Machine.
To turn off tunneling:
-
Log into CommCell Console.
-
Click the Storage tab, and then click Array Management.
-
Select the Storage Virtual Machine for which you want to turn tunneling off, and then click Edit.

-
Click the Snap Configuration tab, clear Use Tunneling, and then click OK.
-
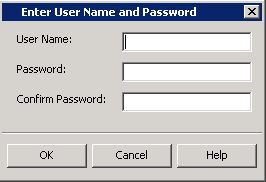
Click the General tab, and then under Credentials, click Change.

-
In the User Name and Password boxes, enter the NDMP credentials, and then click OK.
-
Click OK to close the Filer Properties dialog box.
-
Click OK to close the Array Management dialog box.
How do I select vFiler as the destination for secondary (vault or mirror) copy?
-
Create resource pool with physical filer and not aggregate as resource pool member.
-
When creating secondary snapshot copy, then
Select the resource pool(s) created in (1), and
Enable the "Select vFiler" option and select the required vFiler from the dropdown list.
Can the data on SharePoint Server be restored from the content databases on the SQL Server configured to use NetApp IntelliSnap?
Offline browse and restore for SharePoint 2010 and later is supported on NetApp by using IntelliSnap- SQL Server iDataAgent. The following are the prerequisites to using this feature:
-
The source client machine must have Microsoft SQL Server with an attached Content Database. This can be configured using any one of the following methods:
Configuring clone for the database
-
The destination client machine must have SharePoint Server iDataAgent installed.