Managing Snapshots
The snapshots of the data created by the IntelliSnap backup are also available for various other operations like list, mount, unmount, or delete.
List Snapshots
The browse operation provides the capability to see the snapshots created for an agent, job, or a snapshot copy. The list of the snapshots displayed is corresponding to the entity selected for the browse operation, for e.g., browsing the snapshots for an agent will display all the snapshots created for the selected agent. You can view volume or disk related information for the snapshots. Follow the steps given below to browse snapshots.
-
From the CommCell Browser, navigate to Client Computers | File System | <backupset>.
-
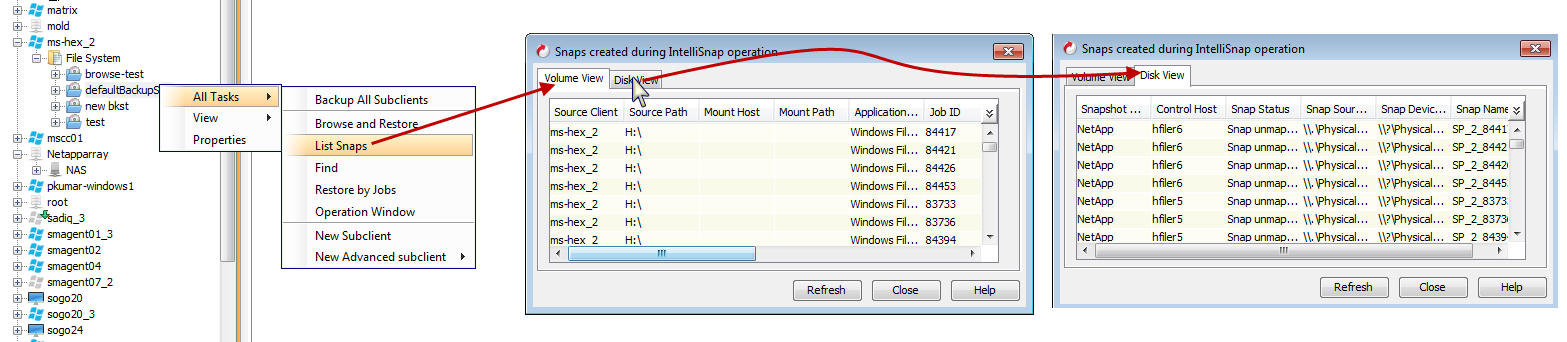
Right-click <backupset> and point to All Tasks | List Snaps.
-
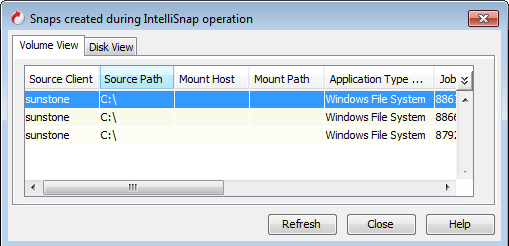
The Snaps created during IntelliSnap operation dialog box displays a list of all the snapshots created for the selected subclient. It also displays important information about each snapshot, including the source mount path, snap mount path, the storage array, and the source client.
- Right-click the snapshot and click Details to view the snapshot properties.
-
Click the Disk View tab to display the snapshot name, e.g. SP_2_79_1286222629.
Mount Snapshots
You can mount any available snapshot to access the data included in the snapshot. Follow the steps below to mount snapshots:When mounting multiple snapshots, note the following:
-
You can mount snapshots from different jobs
-
The snapshots selected for mounting should belong to the same agent (such as Windows File System, UNIX File System, or VMware)
-
Snapshots should be mounted on a MediaAgent with the same operating system as the snapshot volumes. For example, Windows volumes should be mounted on a Windows MediaAgent, and Linux volumes should be mounted on a Linux MediaAgent.
-
There are no limits on the number of snapshots to be mounted. However, increasing the number of snapshots that are selected also increases the time for mounting the snapshots.
-
For Virtual Server Agent (VSA), mount snapshots from the backup set or subclient level. Mounting snapshots from the storage policy is not supported.
-
For VMware, mounting multiple snapshots of the same volume at the same time is not supported
-
If you are using Windows Storage Spaces, the operating system of the destination client computer must be of the same or later version than the operating system of the source client computer to mount or unmount snapshots
If the niSCSIEnable additional setting is configured, IntelliSnap backup will always try to mount using iSCSI method. If this key is not configured, IntelliSnap backup will try to mount using the FC method first. To add or edit an additional setting, follow the steps in Add or Modify an Additional Setting.
Note
To add or edit an additional setting, follow the steps in Add or Modify an Additional Setting.
-
From the CommCell Browser, navigate to Client Computers | File System | <backupset>.
-
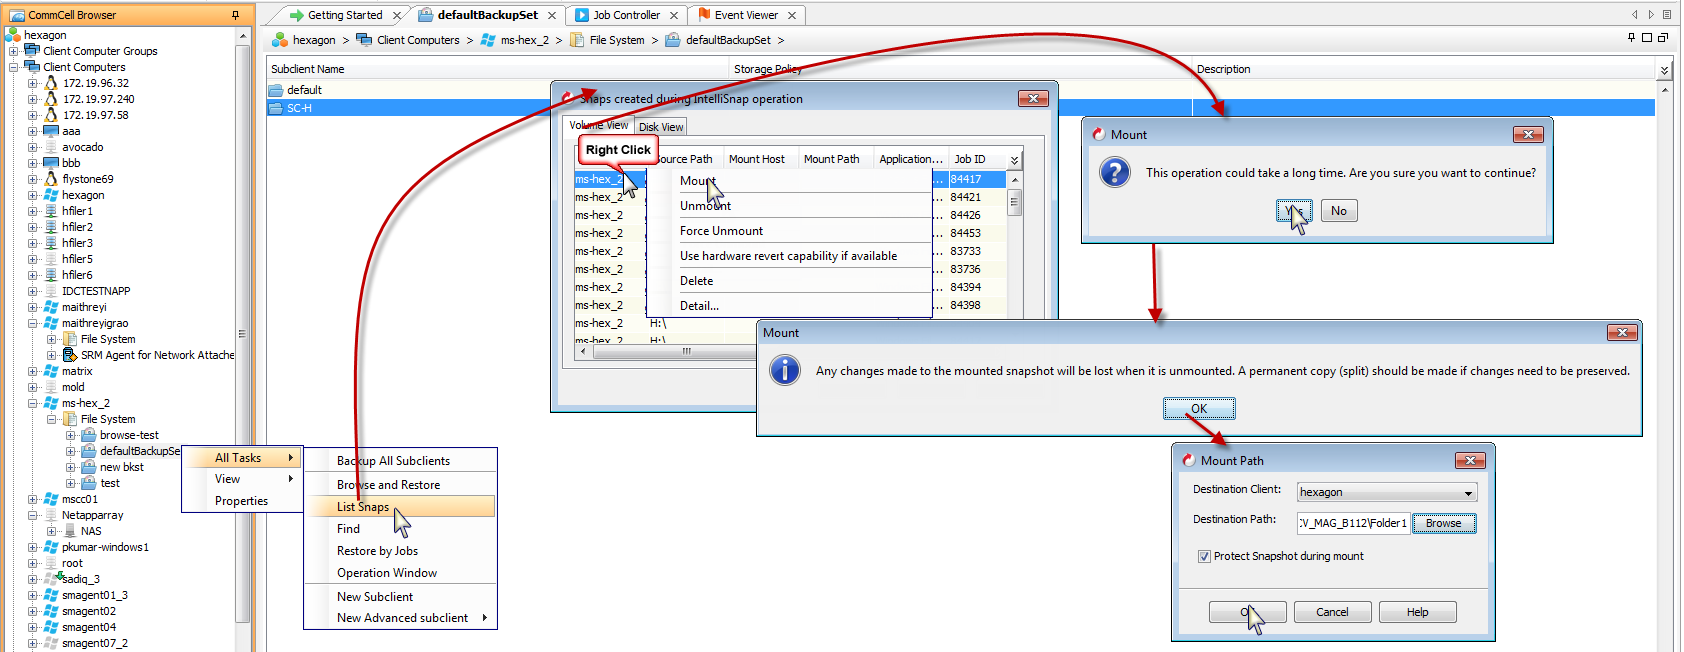
Right-click <backup set> and click All Tasks | List Snaps.
-
Right-click the snapshot that you wish to mount and click Mount.
To select multiple snapshots, hold <Shift> key and select the snapshots to be mounted.
-
Click Yes.
-
In the Mount Path dialog box, specify the destination client and the path on the client in the Destination Client and Destination Path fields.
On a Windows platform, enter a CIFS Share Name for the Agent.
-
If you do not wish to save any changes made to the mounted snapshot after the snapshot is unmounted, select Protect Snapshot during mount.
-
For Windows-based agents, select Protect Snapshot during mount to ensure that the changes made to the snapshot while it is mounted are not retained when you unmount the snapshot. By selecting this option, the snapshot is usable for future snap operations (restore, backup copy, etc.). If this option is disabled, changes made to the snapshot while it is mounted are retained after the snapshot is unmounted. As a result, you cannot use the snapshot for snap operations.
-
Click OK.
Unmount Snapshots
If you are using Windows Storage Spaces, the operating system of the destination client computer must be of the same or later version than the operating system of the source client computer to mount or unmount snapshots.
Follow the steps given below to Unmount Snapshots:
-
From the CommCell Browser, navigate to Client Computers | Virtual Server | <Instance>.
-
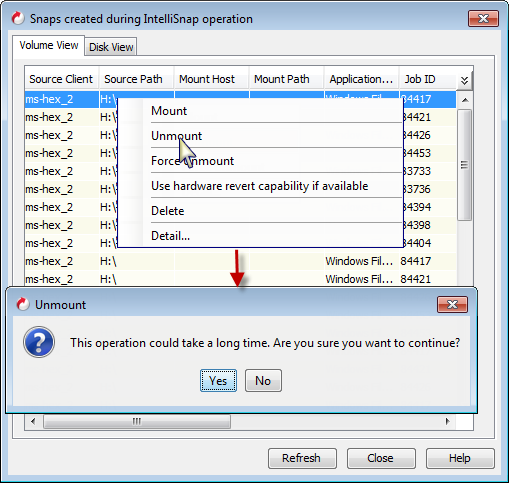
Right-click <backup set> and click All Tasks | List Snaps.
-
Right-click the snapshot you wish to unmount and click Unmount.
To select multiple snapshots, hold <Shift> key and select the snapshots to be mounted.
-
Click Yes when prompted if you want to continue.
Note
If the snapshot does not get unmounted, select the Force Unmount option to mark the snapshot as unmounted.
Delete Snapshots
Snapshots can either be deleted using job-based pruning or from the list of displayed snapshots when browsing snapshots. Data Aging can also be used to define the retention rules and pruning of snapshots. Follow the steps given below to delete snapshots:
Note
Manual deletion of snapshots is not recommended. When a snapshot is deleted, it is no longer possible to perform data recovery operations from the snapshot copy. However, if a backup copy was created from the snapshot, data recovery operations can be performed from the backup copy.
Ensure that the snapshot to be deleted is not mounted.
For NetApp E-series PiT engine, the order to delete snapshots should be the oldest snapshot first.
-
From the CommCell Browser, navigate to Client Computers | <Client> | <Agent>.
-
Right-click the subclient and click List Snaps.
-
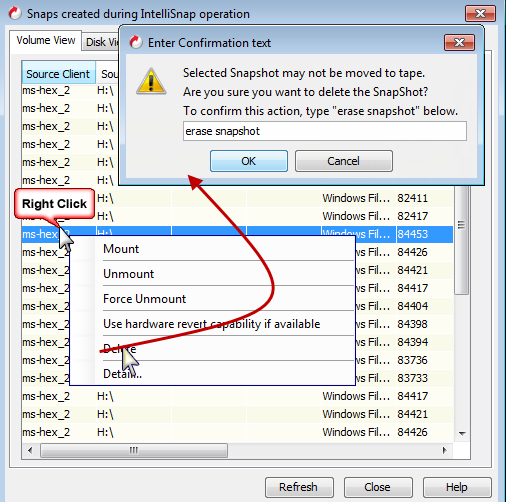
Right-click the snapshot you wish to delete.
Note: Ensure all snapshots with the same Job ID are selected for a successful deletion operation.
-
Click Delete.
-
Enter the confirmation text string, erase snapshots.
-
Click OK.
Revert a Snapshot
You can use the revert operation to bring the data back to the point-in-time when the snapshot was taken. This operation overwrites any modifications to the data since the time when the snapshot was created. This option is available if the storage arrays that you are using supports revert. Revert operations are supported on NetApp File Servers but not from SnapVault or SnapMirror snapshots. You can either perform an application aware revert or a hardware specific revert.
Review the following before performing a revert operation:
-
Revert operations are not supported on Windows clustered disks.
-
Revert is not supported if the snapshot is used by storage pool
-
For Full System IntelliSnap backup, the revert operation is not supported.
On Windows clients, disable automount using the following command:
diskpart> automount disable-
It is recommended to verify the contents of the backup and ensure that you want to perform a revert operation as it is an irreversible operation.
-
If you plan to perform a revert operation, you will not be able to use the associated storage policy for further auxiliary copy operations.
Perform an Application Aware Revert
-
From the CommCell Browser, right-click the entity that contains the data you want to restore, and click All Tasks | Browse Backup Data.
-
From the Browse and Restore dialog box, click OK.
-
Select the data you want to revert and click Recover All Selected.
-
From the Restore Options dialog box, click Advanced.
-
Select the Use hardware revert capability if available option.
-
Click OK to confirm the revert operation.
-
Click OK from the Advanced Restore Options dialog box.
-
Click OK to start the revert.
Note
An application aware revert operation reverts back all the volumes included in the backup.
Perform a Hardware Specific Revert
-
From the CommCell Console, navigate to Client Computers | <Client>.
-
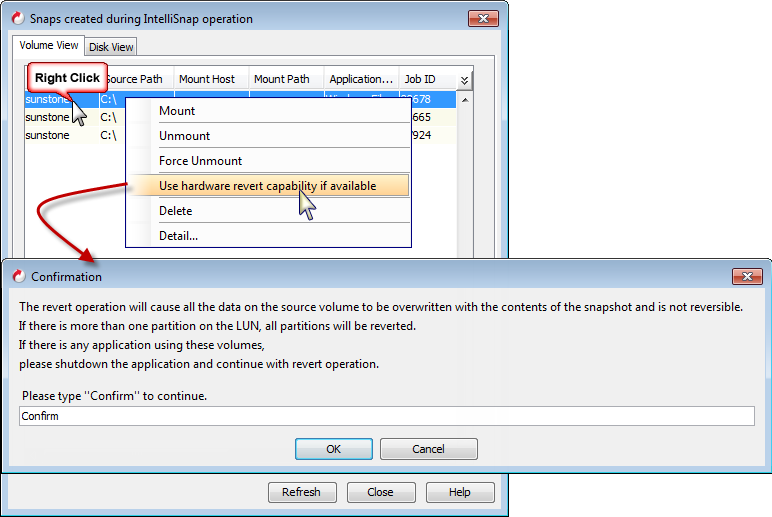
Right-click the subclient and click List Snaps.
-
Right-click the snapshot that you wish to delete and click Use hardware revert capability if available.
-
Enter the confirmation text string, confirm.
-
Click OK.
Snap Reconciliation
For more information about on-demand Reconciliation, see Reconciling the Snapshots of a Storage Array Using Array Management.
Snap Cleanup
If a IntelliSnap operation is in pending/suspended states or is killed, a prune request will be sent immediately and delete the snaps which were taken in that IntelliSnap operation on the storage array. For example, if a IntelliSnap operation is in pending state after taking snaps for data volume, then it will remove the snap for that data volume. Once the job resumes, it will take a snap again from data phase. As clean-up is performed immediately, you need not wait for the data aging job to remove un-useful snaps.
Managing Snapshots from Command Line
Mount Snapshots1
Single Snapshot
This command allows you to mount single snapshot.
qoperation snap [-cs <commserve_host_name>] -o mount [-cid <Commcell Id>] -v <Volume Id> [-dc <Destination Client Name>] [-dpath <Destination Path>] [-tf <tokenfile>] [-tk <token>] [-h]Note
To mount Oracle ASM (Automatic Storage Management) snapshots, provide the ASM diskgroup name in the -dpath option.
To mount VMware snapshots, the "<DestinationPath>" must be in the following format:
"{vcname:<vCenterClientName>,esxname:<ESXHostFQDN>,username:<UserName>,password:<EncryptedPassword>}"
You can create an encrypted password by saving any supported operation (such as a backup or restore job) as a script using the CommCell Console. The script contains the qlogin string with the encrypted password, which you can copy and paste into other scripts.
Multiple Snapshots
This command allows you to mount multiple snapshots.
qoperation snap [-cs <commserve_host_name>] -o mount -v <Volume Id1> -v <Volume Id2> [-dc <Destination Client Name>] [-dpath <Destination Path1>] [-dpath <Destination Path2>]In case of an error, an error code and the error description are displayed in the following format: "snap: Error errorcode: errordescription"
Options:
|
-cs |
CommServe host name |
|
-o |
Operation to be performed on the snapshot |
|
-cid |
CommCell Id |
|
-v |
Volume Id |
|
-dc |
Destination client name |
|
-dpath |
Destination path or ASM diskgroup |
|
-tf |
Reads token from a file |
|
-tk |
Token string |
|
-h |
Displays help |
Diagnostics:
Possible exit status values are:
0 - Successful completion.
1 - CLI usage failures, due to the use of an unsupported option or missing argument.
2 - Any other failure.
Example for mounting a single snapshot:
For mounting -o mount -v volumeID -dc Destination Client Name -dpath Destination Path are mandatory options.
E:\commandline>qoperation snap -v 128 -o "mount" -dc "client1" -dpath "/mpath"
Example for mounting multiple snapshots:
For mounting -o mount -v volumeID -dc Destination Client Name -dpath Destination Path are mandatory options.
E:\commandline>qoperation snap -v 128 -v 129 -o "mount" -dc "client1" -dpath "/mpath1" -dpath "/mpath2"
Example for mounting a single ASM snapshot:
For mounting -o mount -v volumeID -dc Destination Client Name -dpath Destination Path are mandatory options. Specify the ASM diskgroup in the -dpath option.
E:\commandline>qoperation snap -v 128 -o "mount" -dc "client1" -dpath "+ASMSNAP"
Example for mounting multiple ASM snapshots:
For mounting -o mount -v volumeID -dc Destination Client Name -dpath Destination Path are mandatory options. Specify each ASM diskgroup in the -dpath option.
E:\commandline>qoperation snap -v 128 -v 129 -o "mount" -dc "client1" -dpath "+ASMSNAP1" -dpath "+ASMSNAP2"
Example for mounting a single VMware snapshot:
For mounting, -o mount -v <VolumeID> -dc <DestinationClientName> -dpath <DestinationPath> are mandatory options.
E:\commandline>qoperation snap -v 128 -o "mount" -dc "client1"
-dpath "{vcname:my_vcenter_client,esxname:my_esx_host.mydomain.com,username:myname,password:<EncryptedPassword>}"
Example for mounting multiple VMware snapshots:
For mounting, -o mount -v <VolumeID> -dc <DestinationClientName> -dpath <DestinationPath> are mandatory options.
E:\commandline>qoperation snap -v 128 -v 129 -o "mount" -dc "client1"
-dpath "{vcname:my_vcenter_client1,esxname:my_esx_host1.mydomain.com,username:myname,password:<EncryptedPassword>}"
-dpath "{vcname:my_vcenter_client2,esxname:my_esx_host2.mydomain.com,username:myname,password:<EncryptedPassword>}"
Unmount Snapshots
Single Snapshot
This command allows you to unmount single snapshot.
qoperation snap [-cs commserver] -o unmount [-cid Commcell Id] -v Volume Id [-dc Destination Client Name] [-dpath Destination Path] [-tf tokenfile] [-tk token] [-h]Multiple Snapshots
This command allows you to unmount multiple snapshots.
qoperation snap [-cs commserver] -o ummount -v Volume Id1 -v Volume Id2 [-dc Destination Client Name] [-dpath Destination Path1] [-dpath Destination Path2]In case of an error, an error code and the error description are displayed in the following format: "snap: Error errorcode: errordescription"
Options:
|
-cs |
CommServe host name |
|
-o |
Operation to be performed on the snapshot |
|
-cid |
CommCell Id |
|
-v |
Volume Id |
|
-dc |
Destination client name |
|
-dpath |
Destination path |
|
-tf |
Reads token from a file |
|
-tk |
Token string |
|
-h |
Displays help |
Diagnostics:
Possible exit status values are:
0 - Successful completion.
1 - CLI usage failures, due to the use of an unsupported option or missing argument.
2 - Any other failure.
Example for unmounting a single snapshot:
For unmounting -o unmount -v volumeID are mandatory options.
E:\commandline>qoperation snap -v 128 -o "unmount"
Example for unmounting multiple snapshots:
For unmounting -o unmount -v volumeID are mandatory options.
E:\commandline>qoperation snap -v 128 -v 129 -o "unmount" -dc "client1" -dpath "/mpath1" -dpath "/mpath2"
View Snapshot Details
You can view the details of a snapshot for an agent, job, or a snapshot copy. When you right-click any of these entities, you will be able to browse all the snapshots corresponding to the selected entity.
-
From the CommCell Browser, right-click the entity that contains the snapshots you want to browse, and click All Tasks | List Snapshots.
-
The Snapshots created during IntelliSnap operation dialog box displays a list of all the snapshots created for the selected entity and displays important information about each snapshot, including the source mount path, snap mount path, the storage array, and the source client.
-
Right-click the snapshot and click Details to view the snapshot properties.
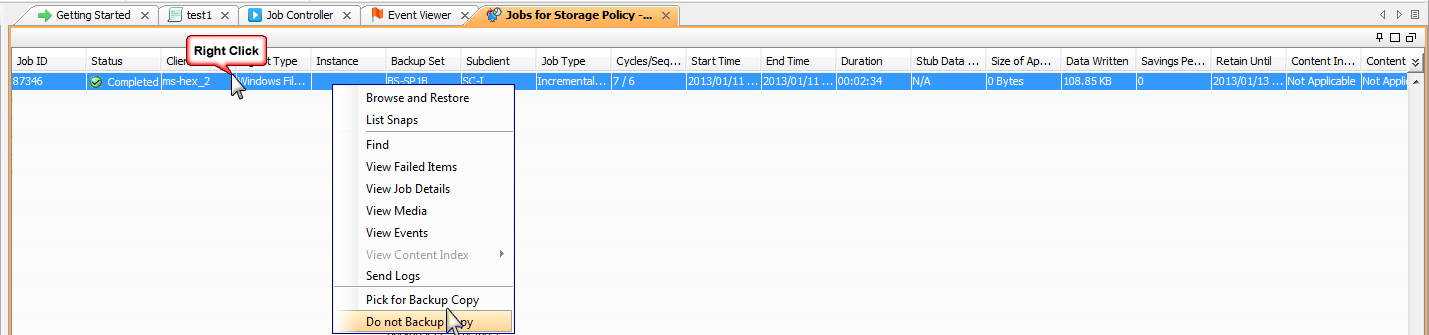
Select a Job for Backup Copy
You can select a specific job for creating backup copy. Once selected, the Move Snap to Tape field for the specific job will be changed to Picked (i.e., the next backup copy operation will move this job to media).
-
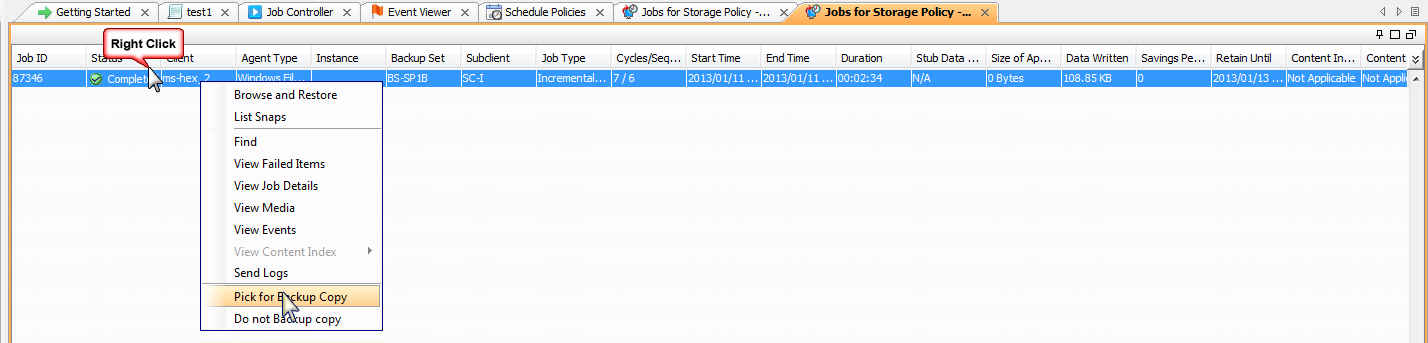
Right-click a storage policy containing IntelliSnap backup jobs, and then click View Jobs.
-
Right-click the job and then click Pick for Backup Copy.
Disable a Job for Backup Copy
You can prevent a job from being moved to media. You can apply this option to those jobs that were previously selected for moving to media. On selecting this option, the Move Snap to Tape field for the specific job will be changed to Not Picked (i.e., the next backup copy operation will not move this job to media).
-
Right-click a storage policy containing IntelliSnap backup jobs and then click View Jobs.
-
Right-click the job and then click Do not Backup Copy.
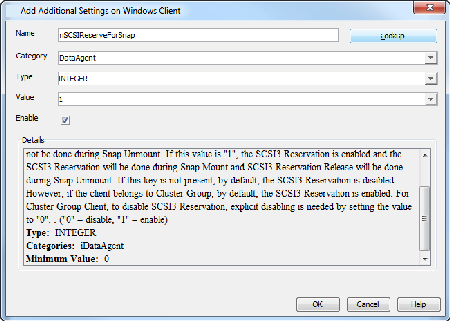
SCSI Reservation
SCSI reservation can be enabled for IntelliSnap backups for all agents. Enabling SCSI reservation prevents other SCSI3-compliant applications from using the reserved SCSI device (the mounted snapshot).
Note: If this option is enabled and the hardware does not support this type of operation, subsequent backup jobs might fail.
Use the following steps to enable SCSI reservation:
-
From the CommCell Browser, navigate to Client Computers.
-
Right-click the <Client>, and then click Properties.
-
Click Advanced.
-
Click the Additional Settings tab.
-
Click Add.
-
In the Name box, type nSCSIReserveForSnap.
-
In the Category box, select iDataAgent.
-
In the Type box, select Integer.
-
In the Value box, type 1.