Understanding the CommCell Console
The MySQL Server iDataAgent uses the following logical entities to manage backup and restore operations from the CommCell Console.
Agent
Facilitates MySQL instance discovery.
Instance
Defines the MySQL Server instance to be backed up.
Subclient
Defines the MySQL databases to be backed up.

Managing Instances
In the CommCell Console, each instance refers to a MySQL server. Therefore, you must create an instance for each MySQL Server that you need to back up.
This topic describes how to create an instance, and how to manage the instance once it is created.
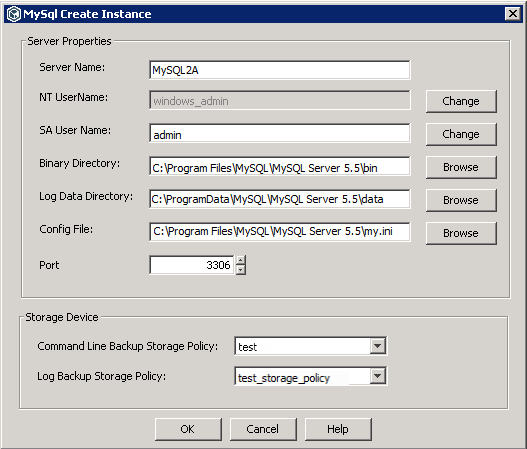
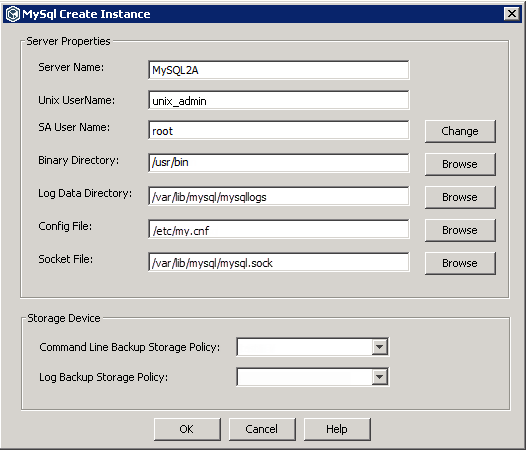
Creating a New MySQL Server Instance
Whenever a new MySQL server is created on the client, you must add the server to the CommCell. To create a MySQL instance, the MySQL user should have DBA and SYSDBA privileges.
-
From the CommCell Browser, navigate to Client Computers | <Client>.
Right-click MySQL, point to All Tasks, and then click New MySql Server.
-
In the Server Name box, type a name for the new MySQL instance that you are creating.
-
In the NT UserName box, type the user name of the Windows local computer on which MySQL Server is installed.
Unix UserName is displayed, if MySQL Server is installed on a UNIX computer.
-
In the SA User Name box, click Change.
Type the MySQL administrator user name. In the Account Password box, enter the account password for the administrator user account. In the Confirm Password box, reenter the password.
-
In the Binary Directory box, enter the path to the directory where the MySQL application files are stored.
For example:
Windows: C:\Program Files\MySQL\MySQL Server 5.5\bin
Unix: /usr/bin
Alternatively, click Browse to select the location.
-
In the Log Data Directory box, enter the directory name where the log files are stored.
For example:
Windows: C:\Program Files\MySQL\MySQL Server 5.5\data
Unix: /var/lib/mysql
Click OK.
-
In the Config File box, enter the path to the configuration file.
For example:
Windows: C:\Program Files\MySQL\MySQL Server 5.5\my.ini
Unix: /etc/my.cnf
-
Depending on which platform you use, enter the TCP/IP port number or the pathname to the socket file.
-
For Windows, enter the TCP/IP port number into the Port box to open the communication between MySQL server and clients.
-
For UNIX, type the path to the socket file or provide the endpoint in hostname:port format, where 'hostname' is the hostname of the client and 'port' is where mysql server is running on the client. Alternatively, click Browse to select the location for socket file.
Note
If you have multiple instances installed on the client computer, make sure that the Binary Directory, Log Data Directory, and the Config File locations, and the Port number or Socket file path are different for each instance that you want to back up.
-
-
In the Command Line Backup Storage Policy box, select the storage policy name.
-
In the Log Backup Storage Policy box, select the storage policy name.
-
Click OK.
Changing the Home Directory
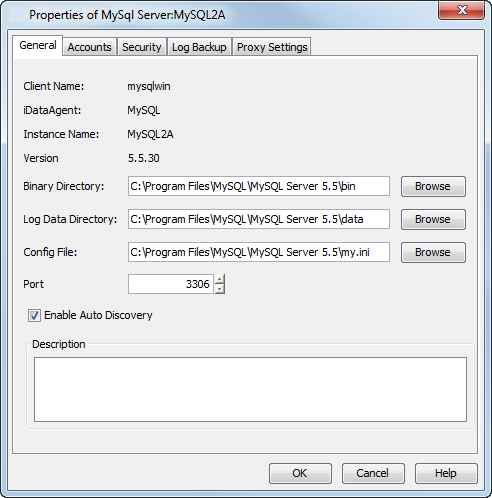
The HOME directory, also called the Binary directory, is the location where the application files are stored. When instances are discovered, the home path is automatically assigned to the instance. However, you can modify the home path location for an instance any time.
-
From the CommCell Browser, navigate to Client Computers | <Client>| MySQL.
-
Right-click the <Instance>, and then click Properties.
-
In the dialog box that appears, enter a new path name into the Binary Directory box.
For example:
Windows: C:\Program Files\MySQL\MySQL Server 5.5\bin
Unix: /usr/bin
-
Click OK.
Changing the Log Directory
The Archive log index file is a text file that is made up of all of the running lists of transaction logs for the MySQL database. This index file (.index) is generated when you enable binary logging, and the index resides in the data directory. Typically, the index file is used to back up the logs. If the binary logging is disabled on the MySQL server, then the path to the data directory is displayed.
-
From the CommCell Browser, navigate to Client Computers | <Client>| MySQL.
-
Right-click the <Instance>, and then click Properties.
-
In the dialog box that appears, enter a new path name into the Log Data Directory box.
For example:
Windows: C:\Program Files\MySQL\MySQL Server 5.5\data
Unix: /var/lib/mysql
Alternatively, click Browse to select the location.
-
Click OK.
Changing the Configuration Files
If there is a compatibility issue with the operating system on Unix clients, rename the config file and map it to the common library that is by the operating system and the iDataAgent.
-
From the CommCell Browser, navigate to Client Computers | <Client>| MySQL.
-
Right-click the <Instance>, and then click Properties.
-
In the dialog box that appears, enter a new path name into the Config File box.
For example:
Windows: C:\Program Files\MySQL\MySQL Server 5.5\my.ini
Unix: /etc/my.cnf
-
Click OK.
Changing the Port or Socket File
-
From the CommCell Browser, navigate to Client Computers | <Client>| MySQL.
-
Right-click the <Instance>, and then click Properties.
-
For Windows, enter the TCP/IP port number to open the communication between MySQL server and clients.

For Unix, enter the path name to the socket file. Alternatively, click Browse to select the location.
-
Click OK.
Configuring User Accounts for Backups
The MySQL agent requires a MySQL Server user account that has sufficient privileges for the software to:
-
Perform backups and restores
-
Access the MySQL Server application
-
Stop or start the MySQL Server services
The following table illustrates the necessary privileges the user account should have to perform backup and restore operations:
|
Operations |
Privileges MySQL User Should Have |
Example Query to Grant the Permission |
|
Backup |
|
It is recommended to grant all Database Administrator privileges to perform backup operations for some versions. Example: For MySQL 5.7 and later, you should grant all Database Administrator privileges to perform backup operations. |
|
Restore |
Full Database Administrator privileges |
|
Initially, the user account credentials is provided during the instance configuration after the installation of the Agent. You can change the user account at the instance level.
-
From the CommCell Browser, navigate to Client Computers > client > MySQL.
-
Right-click the instance, and then click Properties.
The Properties of MySql Server dialog box appears.
-
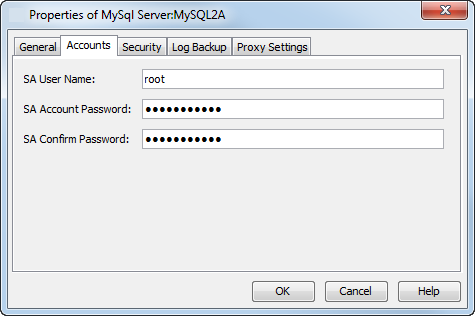
To update the user account information, on the Accounts tab, complete one of the following steps:
-
For Windows,
-
To enter the SA User Name, click Change. Enter the MySQL user name and password.
-
To enter the NT UserName, click Change. Enter the Windows user name and password.
-
-
For Linux,
-
To enter the SA User Name, click Change. Enter the MySQL user name and password.
-
To enter the UNIX UserName, type the Linux user name.
-
-
-
Click OK.
Enabling Automatic Discovery of MySQL Instances
You can automatically discover the new MySQL server instances if you select the Enable Automatic Instance Discovery check box. The automatic discovery ensures that the newly added MySQL instances are regularly accounted for in backup operations.
When you discover MySQL instances, the newly discovered instances are assigned a storage policy as follows:
-
If the default subclient of the file system has a storage policy, then the newly discovered instances inherit that storage policy.
-
If the default subclient of the file system has no storage policy, then you must set a storage policy for the newly discovered instances.
Note
You cannot automatically discover MySQL instances on Solaris.
About This Task
By default, MySQL instances are automatically discovered every 24 hours. Instances are also automatically discovered when the Communications Service (GxCVD) is restarted (for example, after a computer reboot).
Procedure
-
From the CommCell Browser, click Client Computers > client.
-
Right-click MySQL, and then click Properties.
The MySQL Properties dialog box appears.
-
Select the Enable Automatic Instance Discovery check box.
-
Click OK.
-
After the MySQL instances are automatically discovered, if there is no default file system storage policy, follow these steps to set the default storage policy:
-
Right-click the newly-discovered instance, and then click Properties.
The Properties of MySql Server dialog box appears.
-
To select the storage policies for command line backup operation and log backup operation, on the Storage Device tab, complete the following tasks:
-
On the Command Line Backup tab, select a storage policy for command line backup operations from the list.
-
On the Log Backup tab, select a storage policy for log backup operations from the list.
-
Click OK.
-
-
-
Set the user account for the MySQL application at the instance level.
Manually Discovering MySQL Instances
You can manually discover MySQL instances that you want to back up and restore. This one-time operation creates an instance in the CommCell Console for each instance that you discover.
Procedure
-
From the CommCell Browser, expand Client Computers > client.
-
Right-click MySQL, point to All Tasks, and then click Discover Instance.
-
Click Yes.
A newly-discovered instance appears in the CommCell Console.
-
If there is no default file system storage policy, follow these steps to set the default storage policy:
-
Right-click the newly-discovered instance, and then click Properties.
The Properties of MySql Server dialog box appears.
-
To select the storage policies for command line backup operation and log backup operation, on the Storage Device tab, complete the following tasks:
-
On the Command Line Backup tab, select a storage policy for command line backup operations from the list.
-
On the Log Backup tab, select a storage policy for log backup operations from the list.
-
Click OK.
-
-
-
Set the user account for the MySQL application at the instance level.
Enabling or Disabling Automatic Database Discovery
For the MySQL iDataAgent, you can set up the system to search the instance for databases that have not been configured, yet, and add them to the system.
By default, unconfigured databases on the MySQL Server are discovered automatically and assigned to the default subclient. You can enable or disable this functionality.
-
From the CommCell Browser, navigate to Client Computers | <Client> | MySQL | <Instance>.
-
Right-click the instance, and then select Properties.
-
Select or clear Enable Auto Discovery.
-
Click OK.
Note: When you drop an automatically discovered database from the MySQL server, that database is automatically removed from the subclient during the next backup operation, and the backup job completes successfully. You can also find the name of the dropped database in the event viewer.
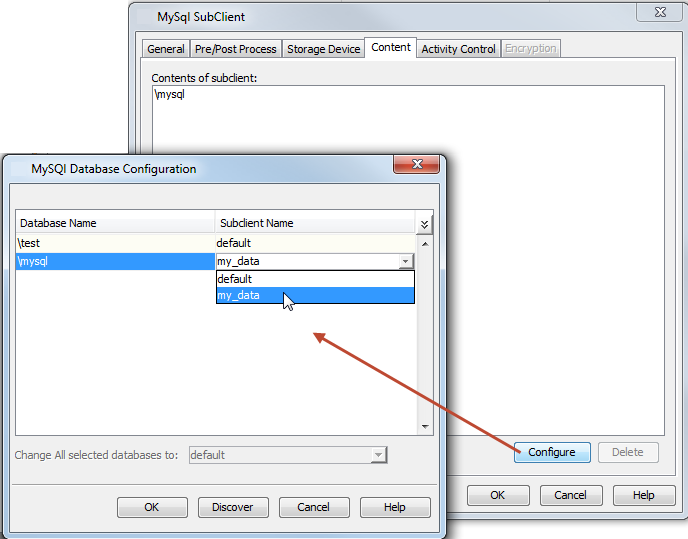
Manually Discovering Databases
If automatic discovery of databases is disabled, you can manually add databases to a subclient.
-
From the CommCell Browser, navigate to Client Computers | <Client> | MySQL | <Instance>.
-
Right-click the default subclient, and then click Properties.
-
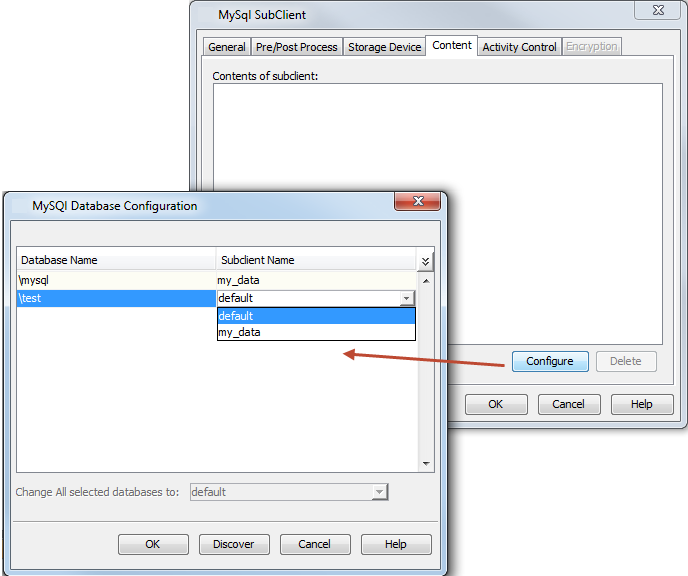
Click the Content tab.
-
Click Configure.
-
Click Discover.
-
To assign the database that you want to add to a subclient, select the appropriate subclient from the Subclient Name list.
-
Click OK to save your settings.
-
Click OK.
Note
When you drop a manually discovered database from the MySQL server, that database is not removed automatically from the subclient during the next backup operation. You should manually delete that database from the subclient, else your next backup operation will complete with error. The error event will be "Found one/more database missing on the database server". You can also find the name of the dropped database in the event viewer.
To avoid completing the backup operation with error, and to display that the backup operation completed successfully, create the additional setting nDisableCWEWarnMySqlNonExistentDB, and set its value as 1.
Creating User-Defined Subclients
By default, all databases within each MySQL Server instance are automatically assigned to the default subclient. This subclient backs up the entire instance. However, you can distribute the database content by creating user-defined subclients.
If you want to back up groups of specific databases, you can do so by creating a user-defined subclient containing any number of databases that exist within the instance. This is useful if you want to back up specific databases at certain intervals or with a particular frequency.
Note
When you create a user-defined subclient, the contents of the user-defined subclient are excluded from the default subclient.
-
From the CommCell Browser, navigate to Client Computers | <Client> | MySQL | <Instance>.
-
Right-click the instance, select All Tasks, and then click New Subclient.
-
On the General tab of the dialog box that appears, enter a name in the Subclient box.
-
Click the Storage Device tab.
-
On the Data Storage Policy sub tab, select the appropriate storage policy from the Storage Policy list.
-
Select the Content tab, and then click Configure.
-
Click Discover on the dialog box that appears.
-
For each database that you want to include, select the name of the appropriate subclient from the Subclient Name list.
-
Click OK to save the content.
-
Click OK.
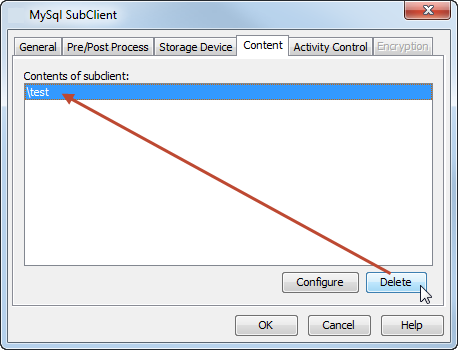
Manually Deleting MySQL Databases from a Subclient
Databases that have been added to the default subclient manually are not removed automatically if they are deleted from the MySQL Server. Such databases must be removed from the subclient manually to make sure that the subsequent backup job completes without any errors.
-
From the CommCell Browser, navigate to Client Computers | <Client> | MySQL | <Instance>.
-
Right-click the default subclient, and then click Properties.
-
Click the Content tab.
-
From the Database List, select the database that you want to delete.
-
Click Delete.
-
Click OK.
Enabling Binary Logging
You must enable binary logging in order to perform transaction log backup. This is done in the MySQL configuration file.
-
On the computer where the MySQL server is installed, navigate to the location of the MySQL configuration file.
For example:
Windows: C:\Program Files\MySQL\MySQL Server 5.5\my.ini
Unix: /etc/my.cnf
-
Open the configuration file to edit it.
-
In the [mysqld] section, add the following:
log-bin=mysql-bin.log -
Restart the MySQL server for the changes to take effect.
-
When the MySQL server is restarted, verify that binary logging is enabled by running the following query:
mysql > show variables like “%log_bin%”If binary logging has been enabled correctly, the value of log_bin = ON. If it has not be enabled correctly, the value of log_bin = OFF.
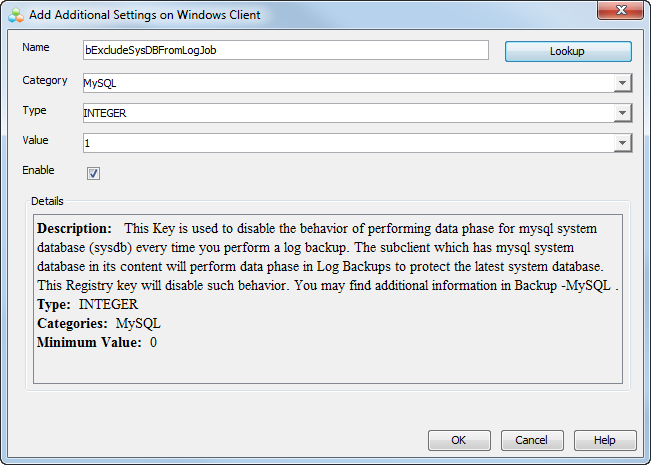
Excluding the Data Phase from Incremental Log Backups for MySQL System Database
During incremental log backups, if MySQL system database is part of a subclient content, then by default the data phase is also run for the MySQL system database after the completion of transaction log backups. You can exclude the data phase from the log backup for MySQL system database.
-
From the CommCell Browser, navigate to the Client Computers node.
-
Right-click the <Client>, and then click Properties.
-
On the Client Computer Properties dialog box, click Advanced.
-
Click the Additional Settings tab and then click Add.
-
In the Name box, enter bExcludeSysDBFromLogJob. The Category and Type details fill automatically.
Alternatively, you can click Lookup and search for the additional setting using the Find box.
-
In the Value box, enter 1.
-
Click OK to save the additional setting configuration.
-
Click OK.
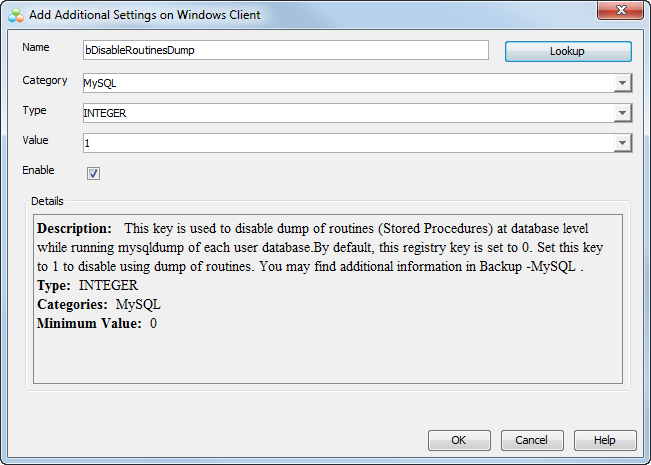
Excluding Stored Procedures from Backup
During mysqldump backups of user databases, the stored procedures (routines) and functions are included automatically in the backup using the routine parameter. You can prevent the dump of routines at the database level when you perform a mysqldump of each user database.
-
From the CommCell Browser, navigate to the Client Computers node.
-
Right-click the <Client>, and then click Properties.
-
On the Client Computer Properties dialog box, click Advanced.
-
Click the Additional Settings tab and then click Add.
-
In the Name box, enter bDisableRoutinesDump. The Category and Type details fill automatically.
Alternatively, you can click Lookup and search for the additional setting using the Find box.
-
In the Value box, enter 1.
-
Click OK to save the additional setting configuration.
-
Click OK.
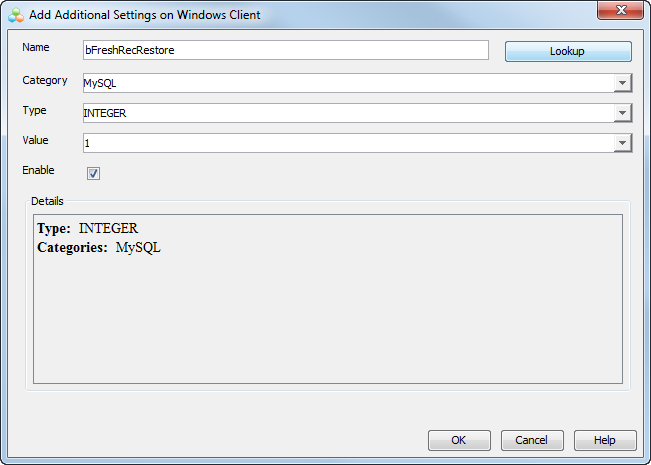
Enabling Non-Full Recurring Restores
By default, the entire MySQL server is included in recurring restores. You can enable non-full recurring restores that include only selected databases, followed by logical log restores.
-
From the CommCell Browser, navigate to the Client Computers node.
-
Right-click the <Client>, and then click Properties.
-
On the Client Computer Properties dialog box, click Advanced.
-
Click the Additional Settings tab and then click Add.
-
In the Name box, enter bFreshRecRestore. The Category and Type details fill automatically.
Alternatively, you can click Lookup and search for the additional setting using the Find box.
-
In the Value box, enter 1.
-
Click OK to save the additional setting configuration.
-
Click OK.
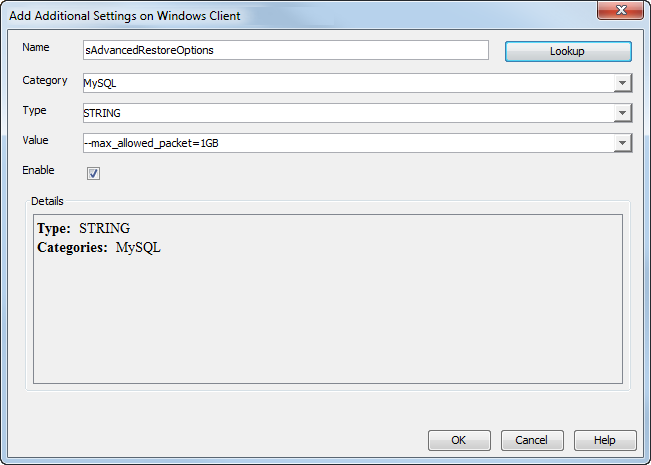
Configuring Packet Buffer Size for Restore
During restores of MySQL databases, the default packet buffer size defined in the max_allowed_packet variable for the MySQL server is used. You can increase the value of max_allowed_packet for the restore.
-
From the CommCell Browser, navigate to the Client Computers node.
-
Right-click the <Client>, and then click Properties.
-
On the Client Computer Properties dialog box, click Advanced.
-
Click the Additional Settings tab and then click Add.
-
In the Name box, enter sAdvancedRestoreOptions. The Category and Type details fill automatically.
Alternatively, you can click Lookup and search for the additional setting using the Find box.
-
In the Value box, enter the appropriate value, for example, --max_allowed_packet=1GB.
-
Click OK to save the additional setting configuration.
-
Click OK.
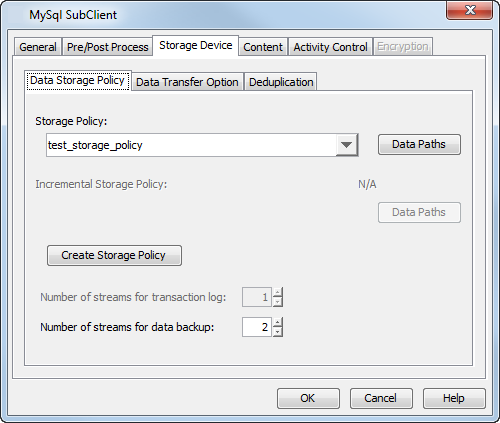
Configuring Streams for Backups
By default, backup data is sent to media in two streams. This means that a database is sent to media during a backup in two parallel waves. The result is that the backup takes about half the time to complete than it would if only one stream is used.
You can increase the number of streams that are used to back up a particular subclient, provided that the number of streams does not exceed the maximum number configured in the subclient's storage policy. The number of streams used during a backup operation depends on the number of databases too. For example, if a subclient has only one database as its content, and if we set the subclient to use five streams, still during a backup operation, the subclient will use only one stream.
Increasing the number of streams for a subclient further reduces the amount of time that a backup takes to complete. For example, increasing the number of streams from two to three enhances the backup time from one-half that of a single stream to one-third.
The same number of streams that are used for performing a backup are needed to restore the data.
-
From the CommCell Browser, navigate to Client Computers | <Client>| MySQL | <Instance>.
-
Right-click the <Subclient>, and then click Properties.
-
Click the Storage Device tab.
-
In the Number of Data Backup Streams box, enter or select the number of data backup streams.
-
Click OK.
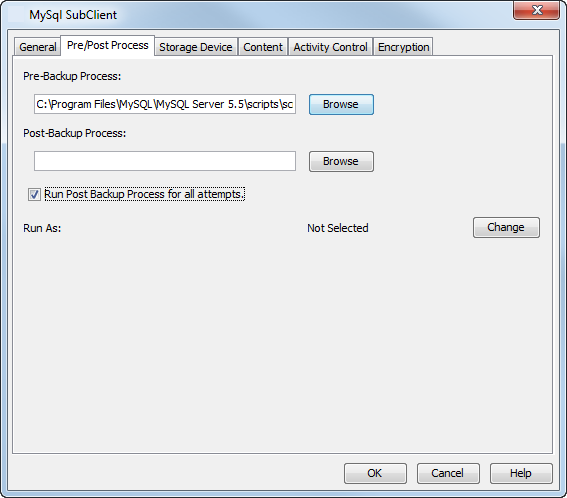
Configuring Pre-processing and Post-processing for Backups
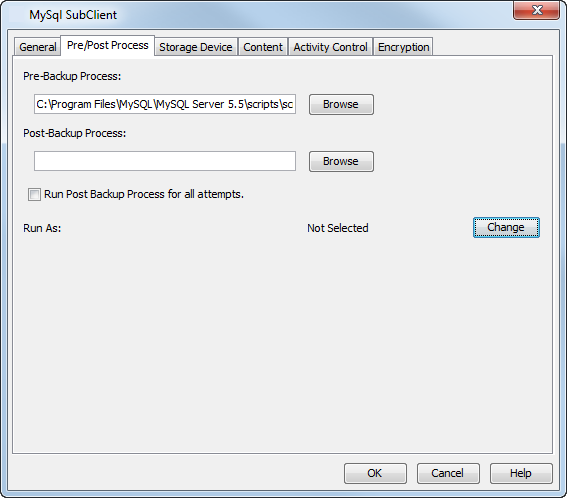
Setting Up Pre-processes and Post-processes
You can add, modify, or view Pre-processes Post-processes for the subclient. These are batch files or shell scripts that you can run before or after certain job phases.
-
From the CommCell Browser, navigate to Client Computers | <Client>| MySQL | <Instance>.
-
Right-click the subclient, and then click Properties.
-
Click the Pre/Post Process tab in the dialog box that appears.
-
In one of the following phases, enter the full path of the process that you want to execute during that phase. Alternatively, click Browse to locate the process (applicable only for paths that do not contain any spaces).
-
PreBackup Process
-
PostBackup Process
-
-
For subclients on Windows platforms, Run As is defined as Not Selected. If necessary, change the account that has permission to run these commands.
-
Click Change.
-
In the User Account dialog box, select Use Local System Account, or select Impersonate User, and then enter the user name and password.
-
Click OK.
-
If you selected Use Local System Account, a message appears that tells you that commands that use this account have rights to access all data on the client computer. Click OK.
-
-
Click OK.
Setting Up Post-processes to Run during Failures
By default, a specified post-process command is executed only on successful completion of the scan or backup operation or if the job is killed.
Use the following steps to run a post-process even if the scan or backup operation did not complete successfully. For example, this may be useful to bring a database online or release a snapshot.
-
From the CommCell Browser, navigate to Client Computers | <Client>| MySQL | <Instance>.
-
Right-click the subclient, and then click Properties.
-
Click the Pre/Post Process tab in the dialog box that appears.
-
Select Run Post Backup Process for all attempts.
-
Click OK.
See Pre-processes and Post-processes - Commands and Arguments for information on additional arguments that the CommServe sends to the Pre-processes and Post-processes.
Enabling Commvault Permissions for MySQL User with SSL Authentication
If SSL authentication is enabled for your login credentials to log into the MySQL Server, you will not be able to create an instance, run a backup or a restore job on Commvault using the same login credentials.
To enable these operations on the CommServe for such a user, create the below mentioned additional settings from the CommCell Console and provide the given values for them.
|
Additional Setting |
Value |
|---|---|
|
1 |
|
|
Location of the Certificate Authority (CA) certificate. For example: sSslCa /newcerts/ca.pem |
For steps on creating additional settings from the CommCell Console, see Add or Modify an Additional Setting.
Modifying an Agent, Instance, or Subclient
There are several configurable properties available for your agent that can be modified from the agent, instance, or subclient level.
The following table describes the properties that can be configured from the client, agent, instance, and subclient levels.
|
Option |
Description |
Related Topics |
|
Change Storage Policies |
You can configure storage policies from the instance level or subclient level. You might need to modify the storage policies in any of the following situations:
|
Refer to Storage Policies. |
|
Rename a Subclient |
You can rename a subclient:
|
|
|
Data Transfer Options |
You can configure the available resources for transferring data secured by data protection operations from the subclient level. This includes the following:
|
Refer to Data Compression and Network Bandwidth Throttling. |
|
View Data Paths |
You can view the data paths associated with the primary storage policy copy of the selected storage policy or incremental storage policy. You can also modify the data paths including their priority from the subclient level.
|
|
|
Configure Activity Control |
You can enable backup and restore operations from the agent and subclient level. However, you can enable restore operations only from the agent level.
|
Refer to Activity Control. |
|
Configure User Security |
You can configure user security from the agent or subclient level. You can perform the following functions:
|
Refer to User Administration and Security. |
|
Enable and Disable Data Encryption |
When you configure encryption at the client level, it is configured automatically for all the subclients associated with all the agents installed on that client. If you want to disable or change the encryption at the subclient level, follow the steps given below:
|
Refer to Data Encryption. |
|
View Software Version and Installed Updates |
At the client level, the Version tab of the Properties dialog box displays the software version of the component.
|
|
|
CommCell Configuration Report |
The CommCell Configuration Report provides the properties of the CommServe, MediaAgents, clients, agents, subclients, and storage policies within the CommCell based on the selected filter criteria.
|
Refer to CommCell Configuration. |
Deleting an Agent, Instance, or Subclient
The following sections describe the steps involved in deleting an agent, instance, or subclient.
When you delete an instance or backupset, the associated data is logically deleted and you can no longer access the corresponding data from CommCell Console for recovery purposes.
For information on how to recover data if you accidentally delete an entity, see Recovering Data Associated with Deleted Clients and Storage Policies.
Deleting an Agent
You must uninstall or deconfigure the agent software from the client computer before deleting it from CommCell Browser. After you delete the client software, you can either leave the corresponding data intact for an appropriate action or you can remove the data immediately. If you choose to remove the data immediately, you must delete the agent from the CommCell Browser. If you delete the agent, all of the agent's data is irretrievably lost.
-
You cannot delete an agent while operations for that agent are running.
-
From the CommCell Browser, navigate to Client Computers > client**.
-
Right-click the agent**, and then click Delete.
-
A confirmation message appears with the following message:
This operation will permanently delete the data backed up from this level and it cannot be restored. -
Click OK to continue with the deletion operation or click No to cancel the deletion.
Deleting an Instance
Consider the following before deleting an instance:
-
When you delete a specific instance all job schedules and job histories that pertain to any of the levels within the deleted instance are deleted.
-
You cannot delete an instance if it is being backed up. Attempts to delete an instance under such conditions cause the deletion to fail. If a backup is in progress, either wait for the backup to complete or kill the backup job using the Job Controller. Once the backup is no longer in progress, you can delete the instance level.
-
You cannot delete an instance if there is only one instance present for an agent. To delete the final instance, you must remove the agent software from the client computer.
-
From the CommCell Browser, right-click the instance that you want to delete, click All Tasks and then click Delete.
-
Click Yes to confirm the deletion. (Clicking No cancels the deletion and retains the node.)
-
Type the requested phrase in the Enter Confirmation Text dialog box and click OK. This should delete the instance.
Deleting a Subclient
Consider the following before deleting a subclient:
-
You cannot delete a default subclient.
-
Schedules associated with the subclient are also automatically deleted.
-
From the CommCell Browser, navigate to Client Computers | <Client> | <Agent> | <Instance>.
-
Right-click the <Subclient> that you want to delete, and then click Delete.
-
A confirmation message is displayed, asking if you want to delete the subclient.
Click No to cancel the deletion and retain the subclient, or click Yes to continue the deletion.