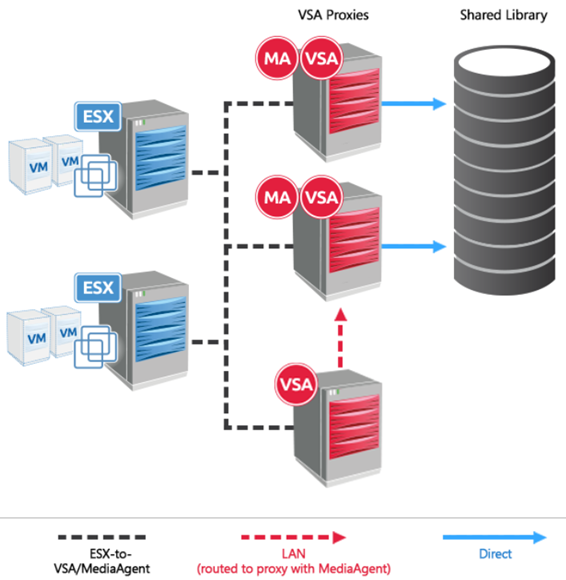
Virtual Server Agent (VSA) clients can use proxies to send backup data directly to shared connected storage, without using the local area network (LAN) to route backup data through another proxy. This approach simplifies library configuration, automatically distributes jobs across all proxies for load balancing, significantly reduces the amount of time required for backups, and minimizes the impact on the network and other resources.
This feature was previously called "LAN-free backups."
Note
This feature is only concerned with how backup data is routed by proxies to backup media. For a fuller discussion of transport throughout the VMware data protection environment, see Transport Modes.
To enable VSA clients to use shared storage for backups, configure proxies and shared storage resources:
-
Install the Virtual Server Agent (VSA) and MediaAgent on each proxy. For more information, see Getting Started.
-
Configure a library to use directly connected storage. Identify a MediaAgent for the proxy that will act as the coordinator for job streams directed to the library, and add a mount path for the library.
-
Configure sharing for the mount path properties, using the same mount path for each MediaAgent that is selected for sharing.
-
Create a storage policy to be used for backup jobs that use shared storage, identifying the library and MediaAgent. Add the data paths for all proxies to the Primary copy for the storage policy.
-
Add all proxies to the Proxies tab for the VMware virtual server instance.
-
Ensure that all subclients point to the storage policy that is configured for shared storage.
When a client initiates a job for a virtual machine, the coordinator proxy determines which MediaAgent is local to the VM. The job stream is moved to the local MediaAgent, which sends data directly to shared storage without routing the data through the LAN. Index updates for all clients are managed at the coordinator proxy.
Note
If data multiplexing is enabled but there are not enough streams available, backups might not be able to write data directly to shared storage without routing the data through the LAN.
Procedure
After the Virtual Server Agent and MediaAgent are installed on all proxies, perform the following steps to configure the resources required for backup jobs that use shared storage.
-
Configure a shared library:
-
In the CommCell Browser, go to Storage Resources > Libraries.
-
Right-click Libraries and select Add > Disk Library.
-
In the Add Disk Library dialog box, enter the library name and select a MediaAgent.
-
Specify either local or network storage:
-
Select Local Path. For Disk Device, enter the path or browse to select a folder.
-
Select Network Path, enter the user name (Connect As) and password, and enter the network path for the Folder field or browse to the network location.
-
-
Click OK.
A library is created under Libraries. Under the library, a mount path is created that corresponds to the path information you entered.
-
-
Configure sharing for the mount path:
-
Right-click the mount path under the library you created and select Properties.
-
In the Mount Path Properties dialog box, go to the Sharing tab and click Share.
-
Select the MediaAgents with which to share the library.
-
For each selected MediaAgent, change the Access value to Read/Write.
-
Specify the same path that was entered for the shared library.
-
Click OK to add the shared MediaAgents, and OK again to save the mount path properties.
The mount path name changes; the new name includes the date when mount path sharing was configured.
-
-
For each of the media agents sharing the library, add and share the mount path:
-
Right-click the library and select Add Mount Path.
-
Select a MediaAgent that shares the library.
-
Enter the same path that was entered for the shared library.
-
Click OK.
-
Right-click the new mount path and select Properties.
-
In the Mount Path Properties dialog box, go to the Sharing tab and click Share.
-
Select the MediaAgents with which to share the library.
-
For each selected MediaAgent, change the Access value to Read/Write.
-
Specify the same path that was entered for the shared library.
-
Click OK to add the shared MediaAgents, and OK again to save the mount path properties.
-
Repeat these steps for any other MediaAgents sharing the library.
-
-
Configure the storage policy:
-
Go to Policies > Storage Policies.
-
Right-click Storage Policies and select New Storage Policy.
-
On the Create Storage Policy Wizard, select Data Protection and Archiving and click Next.
-
Enter the storage policy name and click Next.
-
Select the library you created for shared storage and click Next.
-
Select the MediaAgent for the coordinator proxy and click Next.
-
Accept the defaults for device streams and aging rules and click Next.
-
Accept the defaults for deduplication and click Next.
-
Provide the location for the deduplication database and click Next.
-
Click Finish to create the storage policy.
-
-
Add data paths for all proxies to the Primary copy for the storage policy:
-
In the CommCell Browser, expand the storage policy you created. Right-click the Primary copy and select Properties.
-
Select the Data Paths tab and click Add to add data path candidates for all MediaAgents sharing the library.
-
Click OK to save the data paths and OK again to save the Copy Properties.
Adding the data paths for all MediaAgents enables failover to a different MediaAgent, in the event the MediaAgent handling a job fails.
-
-
Add all proxies to each client:
-
Go to Client Computers > virtualization_client > Virtual Server > VMware.
-
Right-click VMware and select Properties.
-
Click the Proxies tab and click Add to include the other proxies.
-
On the Select Clients / Client Groups dialog, select clients in the Exclude list and click Include to add them as proxies for the virtual server instance.
-
Click OK to save the proxy selections and OK again to save the Virtual Server Instance Properties.
-
Repeat for all clients.
-
-
Specify the storage policy for all subclients:
-
Expand the VMware entry to show the backup sets, then right-click a subclient under the backup set and select Properties.
-
Select the Storage Device tab and choose the storage policy created for backup jobs that use shared storage.
-
Click OK to save the subclient properties.
-
Repeat for each subclient that will use shared storage for backups.
-