Database tables can be restored from an IntelliSnap backup using RMAN. In order to restore database tables, you need to perform an IntelliSnap backup with table browse enabled.
Note
If you use Oracle 12c, you can only perform this procedure on non-Container Databases (CDB).
Best Practice: Use the Oracle catalog when you perform a table-level restore on Oracle 11g or a more recent version. The restore needs the catalog in order to skip Oracle TTS failures that happen when the target connection occurs.
Use the following steps to restore database tables:
-
From the CommCell Browser, navigate to Client Computers | <RAC Client>.
-
Right-click the <Instance> point to All Tasks and then click Restore.
-
Select the Table View check box.
-
Click View Content.
-
In the Browse window, select the tables that you want to restore and click Recover All Selected.
-
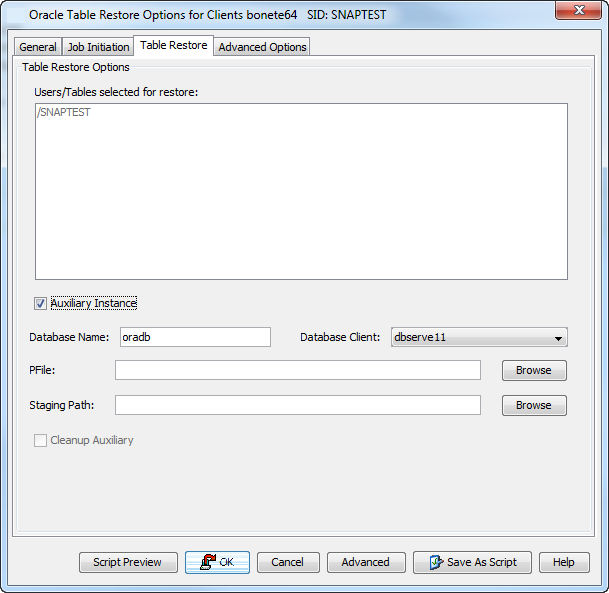
Click the Table Restore tab.
-
Select the Auxiliary Instance checkbox if you want to specify an auxiliary instance for the restore.
When specifying the auxiliary instance, ensure that the database is in NOMOUNT mode.
-
In the Database Name text box, type the auxiliary database name.
-
In the PFile textbox, type the path to the PFile. Alternatively, click Browse to locate the PFile.
-
In the Database Client box, select the client for the auxiliary instance.
When you provide an auxiliary instance, make sure that the temp.dbf file is removed from the operating system in the specified auxiliary instance datafile location.
-
If you are using a backup copy for the restore do the following:
-
Click Advanced.
-
Click the Copy Precedence tab and select the Restore from Copy Precedence checkbox.
-
In the Copy Precedence box, type the copy precedence number for the backup copy and click OK.
-
-
Click OK.
To the Source Database
If some of the tables in the database are lost or corrupted, you can restore those tables back to the same database.
Best Practice: Use the Oracle catalog when you perform a table-level restore on Oracle 11g or a more recent version. The restore needs the catalog in order to skip Oracle TTS failures that happen when the target connection occurs.
Note
If you use Oracle 12c, you can only perform this procedure on non-Container Databases (CDB).
-
From the CommCell Browser, navigate to Client Computers | <RAC Client>.
-
Right-click the <Instance> point to All Tasks and then click Restore.
-
Select the Table View check box and click View Content.
-
From the Browse window, navigate and select the tables to be restored and click Recover All Selected.
-
Click the Table Restore tab.
-
In the Staging Path box, click Browse and select the location where the auxiliary instance will be created.
-
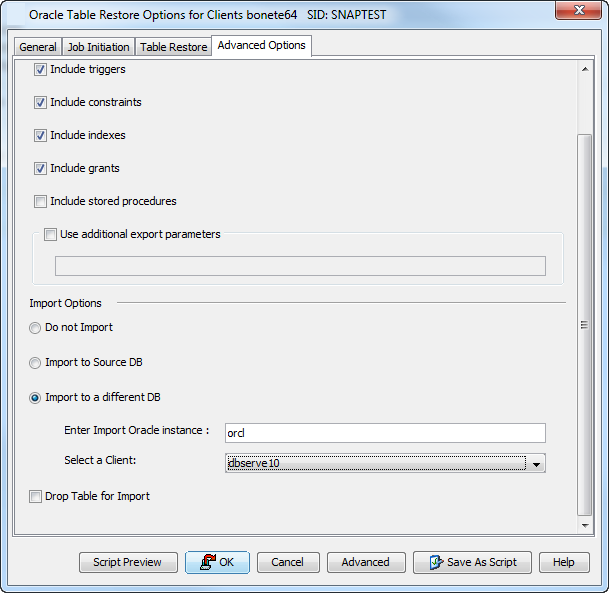
Click the Advanced Options tab.
-
Select Import to Source DB.
-
Click OK.
To a Different Database on the Same Host
Note
If you use Oracle 12c, you can only perform this procedure on non-Container Databases (CDB).
Best Practice: Use the Oracle catalog when you perform a table-level restore on Oracle 11g or a more recent version. The restore needs the catalog in order to skip Oracle TTS failures that happen when the target connection occurs.
Use the following steps to restore tables to a different database on the same host:
-
Add the destination instance name in the Listener.ora and Tnsnames.ora files.
-
From the CommCell Browser, navigate to Client Computers | <Client> | Oracle.
-
Right-click the <Instance>, point to All Tasks and select Browse and Restore.
-
Select the Table View check box and click View Content.
-
From the Browse window, navigate and select the tables to be restored and click Recover All Selected.
-
Click the Table Restore tab.
-
In the Staging Path box, type the location where the tables will be restored.
-
Click the Advanced Options tab.
-
Select Import to a Different DB.
-
In the Enter Import Oracle Instance: box, type the destination instance name.
-
In the Select a Client box, select the source client.
-
Click OK.
Setting Up the Auxiliary Instance
By default, when you restore database tables to a target instance, the system automatically duplicates the source database to an auxiliary instance in a temporary staging location specified during the restore operation. The database will be automatically imported from this auxiliary instance after the restore.
Use the following steps to set up a specific database as an auxiliary instance. This is useful when you want to restore a table to a specific failure point.
-
Copy the init<SID>.ora file from the source database to the auxiliary database instance.
-
Update the database name and the database file locations in the init<SID>.ora file for the auxiliary database instance.
-
Add the DB_FILE_NAME_CONVERT and LOG_FILE_NAME_CONVERT parameters in the init<SID>.ora file. These parameters will redirect the datafiles, temp files, and log files to the auxiliary instance.
Using a User-defined Auxiliary Instance
By default, when you restore database tables to a target instance, the system automatically duplicates the source database to an auxiliary instance in the specified temporary staging location. Once the database is duplicated, you can import the tables to the target instance.
However, if required, you can also use an user-defined auxiliary instance for the restore operation. This is used when you want to restore a table to a specific failure point.
Note
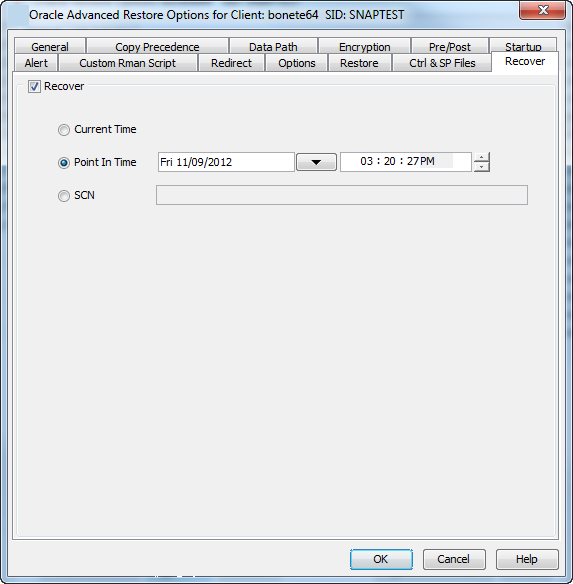
When restoring tables to a different host, if a user-defined auxiliary instance option is selected for the restore, you need to recover the database to a specified point-in-time or SCN number. You cannot recover the database to the current time using an user-defined auxiliary instance.
Best Practice: Use the Oracle catalog when you perform a table-level restore on Oracle 11g or a more recent version. The restore needs the catalog in order to skip Oracle TTS failures that happen when the target connection occurs.
Setting Up the Auxiliary Instance
-
Copy the init<SID>.ora file from the source database to the auxiliary database instance.
-
Update the database name and the database file locations in the init<SID>.ora file for the auxiliary database instance.
-
Add the DB_FILE_NAME_CONVERT and LOG_FILE_NAME_CONVERT parameters in the init<SID>.ora file. These parameters will redirect the datafiles, temp files, and log files to the auxiliary instance.
Windows Clients:
DB_FILE_NAME_CONVERT=('sourcE_of_df_path/','dup_of_df_path/','source_of_temp_path/','dup_of_temp_path/',...)
LOG_FILE_NAME_CONVERT=('source_of_log_path/redo','dup_of_log_path/redo')
UNIX Clients:
DB_FILE_NAME_CONVERT=(source_of_df_path/,dup_of_df_path/,source_of_temp_path/,dup_of_temp_path/,...)
LOG_FILE_NAME_CONVERT=(source_of_log_path/redo,dup_of_log_path/redo)
-
Add the log_archive_dest_1 parameter is added to the init<SID>.ora file on the auxiliary instance.
-
Restart the Oracle Services, if using Windows clients.
-
Add the destination instance name in the Listener.ora and Tnsnames.ora files. If using a different host, add the duplicate database instance name in the Listener.ora file on the destination host and Tnsnames.ora files on the destination and source hosts. Also, add the original database name in the Tnsnames.ora file on the destination host.
DUPDB = (DESCRIPTION =
(ADDRESS = (PROTOCOL = TCP)(HOST = powerpc02)(PORT = 1521))
(CONNECT_DATA = (SERVER = DEDICATED)
(SERVICE_NAME = dupdb) (UR=A) ) )
-
Restart the Listener.
$lsnrctl reload
-
Ensure that the auxiliary instance is in NOMOUNT mode.
sql> startup nomount;
Restoring the Tables Using the Auxiliary Instance
-
From the CommCell Browser, navigate to Client Computers | <RAC Client>.
-
Right-click the <Instance> point to All Tasks and then click Restore.
-
Select the Table View check box and click View Content.
-
From the Browse window, navigate and select the tables to be restored and click Recover All Selected.
-
Click the Table Restore tab.
-
Select the Auxiliary Instance checkbox.
-
In the Database Instance box, type the auxiliary instance name.
-
In the Database Client box, select the destination client for the auxiliary instance.
-
In the PFile box, type the path to the PFile of the auxiliary instance. Alternatively, click Browse to select the path.
-
In the Staging Path box, type the location where the auxiliary instance will be created. Alternatively, click Browse to select the path.
-
Click the Advanced Options tab.
-
Select Import to a Different DB.
-
In the Enter Import Oracle Instance: box, type the destination instance name.
-
In the Select a Client box, select the destination client.
-
Click Advanced.
-
Select the Recover tab.
-
Select Point-in-Time checkbox and specify the time range to which the database need to be recovered.
-
Click OK.
Disabling Clean Up of Auxiliary Instance after Restore
By default, the system generated auxiliary instance is deleted automatically once the tables are imported to the destination instance.
Best Practice: Use the Oracle catalog when you perform a table-level restore on Oracle 11g or a more recent version. The restore needs the catalog in order to skip Oracle TTS failures that happen when the target connection occurs.
Use the following steps to disable the clean-up of auxiliary instance after the restore:
-
From the CommCell Browser, navigate to Client Computers | <RAC Client>.
-
Right-click the <Instance> point to All Tasks and then click Restore.
-
Select the Table View check box and click View Content.
-
From the Browse window, navigate and select the tables to be restored and click Recover All Selected.
-
Click the Table Restore tab.
-
In the Staging Path box, type the location where the tables will be restored.
-
Clear the Cleanup Auxiliary checkbox.
-
Click OK.
Restoring Tables with Non-English Characters
By default, you can restore the tables with English characters. Use the <ORACLE_SID>_NLS_LANG additional setting to restore the non-English characters in the tables.
To add or edit an additional setting, follow the steps in Add or Modify an Additional Setting.
Use these arguments:
-
In the Name box, type <ORACLE_SID>_NLS_LANG. For example, tsrst119_NLS_LANG
-
In the Category box, select or typeOracleAgent from the list.
-
In the Type box, select String
-
In the Value box, set the database's character set as per your database's character set and then click OK.
For example, if the database’s nls character set value is ZHS16GBK, you can set NLS_LANG additional setting to AMERICAN_AMERICA.ZHS16GBK. By default this value is set to AMERICAN_AMERICA.US7ASCII.
Exporting Table Objects
During table restores, the tables are exported from the auxiliary instance to the destination client and later imported to the target database. By default, the following data objects are exported along with the tables:
-
Triggers
-
Constraints
-
Indexes
-
Grants
However, the stored procedures associated with the selected tables are not exported by default. Use the following steps to export the stored procedures and additional export parameters, such as (COMPRESS or PARALLEL):
Note
Stored procedures are restored from the Schema level. Schema is the collection of data objects created by the user to contain or reference their data. Hence, if one of the table within the schema is selected for restore, all the stored procedures for that schema will also get restored.
Best Practice: Use the Oracle catalog when you perform a table-level restore on Oracle 11g or a more recent version. The restore needs the catalog in order to skip Oracle TTS failures that happen when the target connection occurs.
When exporting the tables, the datapump export utility is used if it is supported by the Oracle application. The datapump utility facilitates the export of stored procedures. In oracle versions that do not support datapump export utility, you will not be able to include stored procedures during export.
-
From the CommCell Browser, navigate to Client Computers | <RAC Client>.
-
Right-click the <Instance> point to All Tasks and then click Restore.
-
Select the Table View check box and click View Content.
-
From the Browse window, navigate and select the tables to be restored and click Recover All Selected.
-
Click the Table Restore tab.
-
In the Staging Path box, type the location where the auxiliary instance will be restored.
-
Click the Advanced Options tab.
-
Select the Include Stored Procedures checkbox.
-
Select Use additional export parameters checkbox and type the parameters to be exported.
-
Click OK.
Deleting Existing Tables during a Restore
By default, the restore operation will overwrite the existing tables in the destination database during the restore. You can also configure the restore operation to delete the existing tables before performing the restore.
Manually drop/delete the existing tables at the destination instance and then import the tables.
Best Practice: Use the Oracle catalog when you perform a table-level restore on Oracle 11g or a more recent version. The restore needs the catalog in order to skip Oracle TTS failures that happen when the target connection occurs.
Use the following steps to automatically delete existing tables on the destination instance during restore. Note that you can also manually drop/delete the existing tables at the destination instance and perform the restore without enabling this option.
-
From the CommCell Browser, navigate to Client Computers | <RAC Client>.
-
Right-click the <Instance>, point to All Tasks and then click Browse and Restore.
-
Select the Table View check box and click View Content.
-
From the Browse window, navigate and select the tables to be restored and click Recover All Selected.
-
Click the Table Restore tab.
-
In the Staging Path box, type the location where the tables will be restored.
-
Click the Advanced Options tab.
-
Select Import to Source DB.
-
Click Drop Table for Import check box.
-
Click OK.