Audit Trail
The Audit Trail feature allows you to track the operations of users who have access to the CommCell. This capability is useful if a detrimental operation was performed in the CommCell and the source of that operation needs to be determined.
Audit Trail tracks operations according to four severity levels:
-
Critical: This level records operations that will result in imminent loss of data.
-
High: This level records operations that may result in loss of data.
-
Medium: This level records changes to the general configuration of one or more entities. Such changes may produce unintended results when operations are performed.
-
Low: This level records changes to status, addition of entities, and other operations that have minimal impact on existing CommCell functions.
To set Audit Trail retention periods:
-
From the Home tab in the CommCell Console, click Control Panel and then, from the Monitoring options, click Audit Trail.
-
From the Audit Trail dialog box, select the desired retention time (in days) for each severity level.
-
Click OK.
For details, see Audit Trail.
Storage Policy
A Storage policy defines the data lifecycle management rules for protected data. Storage policies map data from its original location to a physical storage media and determine its retention period.
-
From the CommCell Browser, navigate to Policies.
-
Right-click Storage Policies, and then click New Storage Policy.
-
Click Next.
-
Select Data Protection and Archiving to create a regular storage policy or CommServe Disaster Recovery Backup to backup the CommServe database and click Next.
-
In the Storage Policy Name box, specify the name of the storage policy, and then click Next.
-
From the Library list, select a library for the primary copy, and then click
-
From the MediaAgent list, select the MediaAgent, and then click Next.
-
Enter number of data streams and set the retention period for the policy, and then click Next.
-
Click Next.
-
From the MediaAgent Name list, select the MediaAgent.
-
In the Location box, type or click Browse to your designated deduplication database location, and then click Next.
-
Confirm your selections, and then click Finish.
For details, see Storage Policy.
Subclient Policy
Subclient policies allow you to configure multiple subclients within a CommCell from a centralized template. This alleviates the need to manually configure each subclient that shares a similar configuration.
-
Expand the Policies node, right-click Subclient Policies and click New Subclient Policy.
-
Enter policy name in the Name entry field, then select the appropriate file system type from the iDataAgent drop-down list.
-
In the Subclient pane, assign a storage policy for each subclient template by clicking in the drop down box under the Storage Policy column.
-
Click OK.
For details, see Subclient Policies.
Schedule Policy
An agent specific data protection schedule policy can be used as a scheduling template for data protection operations for Backup iDataAgents in a CommCell.
This type of data protection policy is useful when there are many clients or subclients within the CommCell that require same schedules for specific data protection operations. Additionally this policy provides the ability to granularly define advanced data protection options specific to the Backup iDataAgents.
Use the steps given below to create a data protection schedule policy:
-
From the CommCell Browser, navigate to Policies.
-
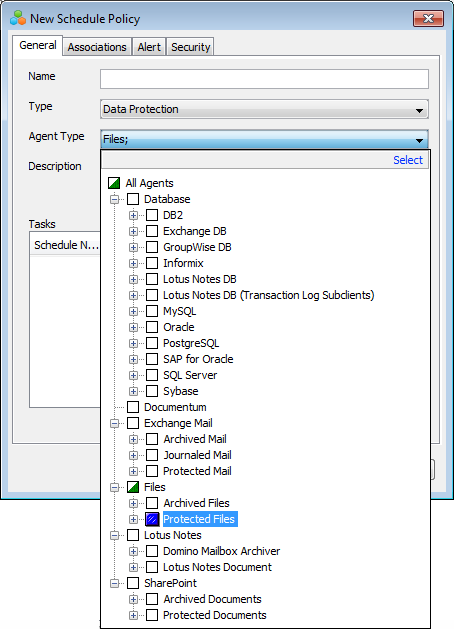
Right-click Schedule Policies and click New Schedule Policy.
-
Type a name for the schedule policy in the Name box.
-
From the Agent Type list, expand Files | Protected Files and select the specific agent. For example, Windows File System.
-
Type an appropriate description in the Description box.
-
Click Add.
-
Type a name in the Schedule Name box and select the appropriate scheduling options.
-
Click the Backup Options tab and select the type of backup and other options that apply to your environment.
Optionally, you can click Advanced to define advanced backup options for the agents.
-
Click OK.
-
Click the Associations tab.
-
Select the client computer or client groups that you want to associate with the schedule policy. You can also associate the schedule policy to a specific Agent, backup set or subclient of a client computer by expanding the client node.
-
Click OK.
Auxiliary Copy
An auxiliary copy operation allows you to create secondary copies of data associated with data protection operations, independent of the original copy.
-
Expand the Policies node, right-click storage policy for which you want to perform an auxiliary copy, click All Tasks,and then click Run Auxiliary Copy.
-
If you are starting the auxiliary copy operation from the CommServe level, select the storage policy for which you wish to perform the auxiliary copy.
Note
If you are starting the auxiliary copy operation from the Storage Policy level, the Storage Policy field is already populated with the name of the Storage Policy you selected.
-
If the source copy is configured with a shared library, select the Source MediaAgent for the auxiliary copy.
-
Click OK to start the auxiliary copy operation. A progress bar displays the progress of the operation.
For details, see Auxiliary Copy.
Blackout Window
You can prevent operations from running during certain times of the day. For example, do not run operations during the daytime when resources such as network bandwidth, data, or storage resources are busy. By default, all operations in the CommCell environment run for 24 hours without restriction.
When operation rules are added to a blackout window, operations that start during the time window specified go to a queued (as opposed to pending) state. After the operation rule time window elapses, operations resume automatically.
For information about creating a blackout window, see Setting Operation Rules.
Operating System and Application Upgrades
Operating system upgrades are only supported when upgrading from one version of an OS to a different version of the same OS (e.g., Win2003 to Win2008). The two methods of upgrading are:
-
Seamless Upgrade - This involves uninstalling the Agent software, upgrading the operating system, and then re-installing the Agent software.
-
Full OS Replacement - This involves performing a clean install of a new version of the OS, re-installing any application software, then re-installing the CommServe, MediaAgent, and/or Agent software.
For Full OS Replacement, the client computer must be configured to have the CommServe, MediaAgent, and/or Client software re-installed to the same location, the same Fully Qualified Domain Name or short domain name, the same partitions, disk drive format (FAT, NTFS, et. al.), and IP configuration as previously.
Caution
If it is necessary to remove Agent software to facilitate an operating system or application upgrade, do not delete the icon for the Agent from the CommCell Console, or all associated backed up data will be lost.
Use the following strategy to upgrade the operating system software:
-
Identify the computers you want to upgrade and the CommCell components installed on each of these computers.
-
Choose the type of upgrade procedure you want to use on each computer: seamless or full replacement.
-
CommServe, MediaAgent, and Client computers can be upgraded in any order.
For details, see Operating System and Application Upgrades.
Reference Copy
Reference copy is a filtered backup of content from existing backups. You can run reference copy jobs on backed up data from Windows File System and Unix File System clients.
Note
Clients of the same Agent type can be specified as the subclient content.Example: Windows File System clients can be specified as subclient content for a Windows File System Reference Copy client.
See Reference Copy - Configuration for step-by-step instructions.
Global Filters
Global Filters are exclusions that filter data from backups across all Agents in a CommCell that support the feature. Global Filters serve as a template for files, folders, and entities that should always be excluded from all (or most) backups in a CommCell, such as temporary data a computer does not retain or data that is recoverable by means other than a restore. This saves space on media and enhances backup performance.
By default, filters configured for a particular subclient override any Global Filters configured for the CommCell. You can, however, configure subclients to include global filters along with any filters already configured for the subclient.
For details, see Global Filters.
Configure Global Filters
-
From the CommCell Browser, right-click the CommServe, click Control Panel, and then click Global Filters.
-
Select Use Global Filters on All Subclients.
-
Click Browse to locate the files or folders to be excluded from backups and click OK.
-
Click OK to save your changes.
Enable Global Filters for a Subclient
-
From the CommCell Browser, right-click the subclient for which you want to enable Global Filters and click Properties.
-
Click the Filters tab.
-
Select one of the following values from the Include Global Filters list:
-
ON to enable Global Filters for this subclient.
-
OFF to disable Global Filters for this subclient.
-
Use Cell Level Policy to enables or disables Global Filters for this subclient.
Note
If the Use Global Filters on All Subclients option is enabled, then the Use Cell Level Policy option will enable Global Filters on this subclient.
If the Use Global Filters on All Subclients option is disabled, then the Use Cell Level Policy option will disable Global Filters on this subclient.
-
-
Click OK.
Delete Backup and Archive Data
Data that has been backed up or archived can be permanently deleted so that it is no longer available for browsing and recovery. Data that has been deleted cannot be restored.
For more information, see Delete Backup and Archive Data.
Online Help Links
Use the following links to view the online help for the corresponding tabs in the CommCell Console: