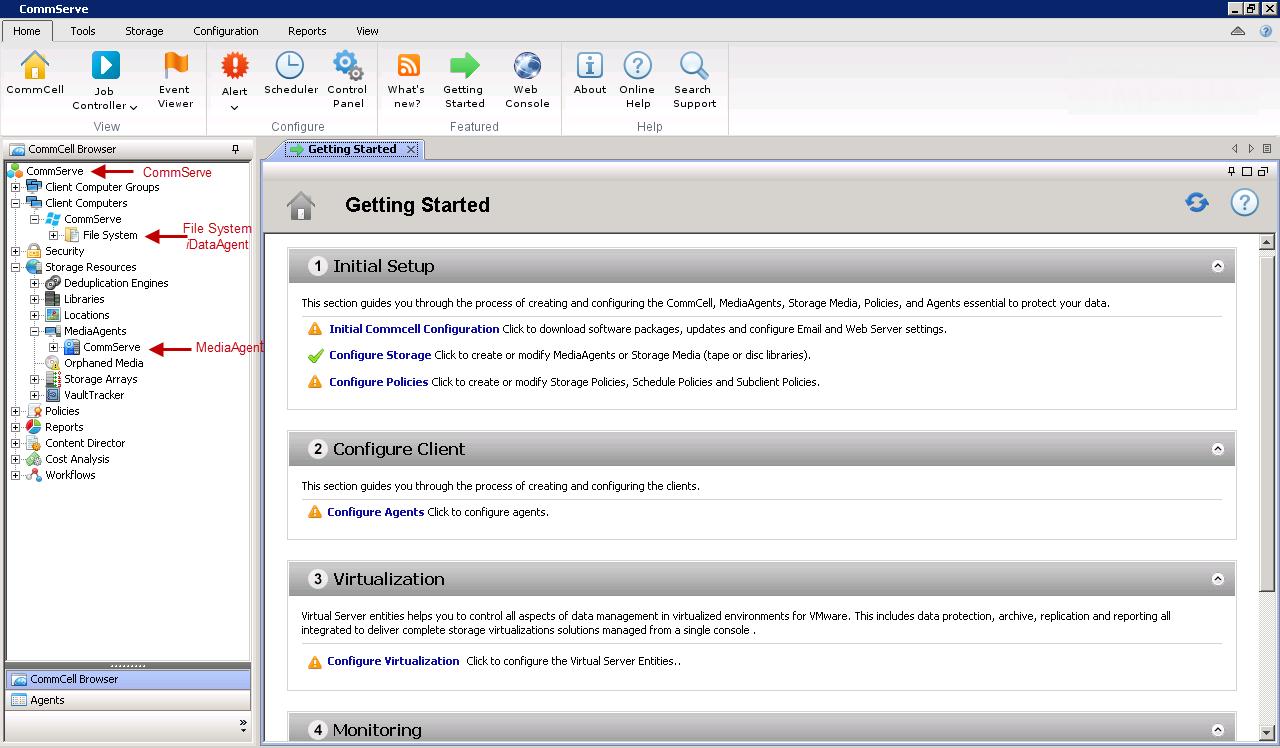
Understanding the CommCell Console
Windows File System iDataAgent uses following main components to perform backup and restore operations from the CommCell Console.
Backup Set - collective information of all the data that needs to be backed up for the client.
Subclient - defines the data to be backed up.
Configuring the Client Computer for IntelliSnap
Once installed, the Windows File System iDataAgent requires some additional configuration before running your first IntelliSnap backup. Follow the steps given below to complete the configuration for this Agent.
-
From the CommCell Console, expand Client Computers > client.
-
Right-click the appropriate client and click Properties.
-
In the Client Computer Properties dialog box, click Advanced.
-
In the Advanced Client Computer Properties,click the Enable IntelliSnap option to enable IntelliSnap backup for the client.
-
Click OK.
Creating an On-Demand Backup Set
On-Demand backups allow content to be specified as an external input when initiating a backup. Whereas traditional backups are performed using subclients, which contain fixed content configured prior to performing the operation, On- Demand backups allow you to specify content each time you perform a backup.
Content for On-Demand backups is defined through two entities:
-
a Content File, which is a text file that defines the location of the data that you want to protect. Each Content File contains the fully qualified paths from the root directory to files, links, and devices to be backed up.
-
a Directive File, which is a text file that defines where each Content File is located. The Directive File contains the fully qualified paths from the root directory to one or more Content Files. Only one Directive File is needed for a single On-Demand backup.
Once these entities are defined, an On-Demand Backup Set is then created. Backups performed from this Backup Set will allow you to select the Content and Directive Files to be included.
Formatting Content and Directive Files
Content File entries should be in the following format:
\\client1\shares\ondemand_content\test1.txt
c:\data\datafile.txt
Similarly, Directive File entries should be in the following format:
c:\temp\ContentFile1.txt
Filters, wildcards, regular expressions and blank lines should not be included in Content or Directive files.
Configuring On-Demand Backups
Create one or more Content Files defining the content to be backed up.
-
From the CommCell Browser, navigate to Client Computers | <Client>.
-
Right-click the File System, point to All Tasks and then click New On Demand Backup Set.
-
In the New Backup Set Name box, type a name (up to 32 characters).
-
Click OK.
Create a Directive File defining the locations of each Content File.
Note
Once an On-Demand Backup Set has been created, it cannot be changed into a traditional backup set.
Adding Files and Folders with Unicode Characters to Content Files
If the path or the filename contains Unicode characters, the Content File must be converted to a format that can be used by the data protection operation. The Unicode Conversion utility must be used to convert the Content File to a format that can be provided as input.
-
Using a text editor, create a file that contains a list of files or folders with Unicode characters and save the file as a Unicode text file.
-
From the command line, navigate to the <software install folder>/Base folder and type the following:
./CVconvertUnicode <source file> <destination file>
where:
-
<source file> is the full path and name of the file created in Step 1.
-
<destination file> is the full path and name of the destination file. This file is automatically created by the utility.
-
-
Use the destination file as the content file to perform an On-Demand backup.
Preventing Duplicate Backups of Files
On-Demand Backups explicitly back up the files listed in the Content File. If the Content file has two entries for the same file, the file will be backed up twice.
For example, consider a Content File that lists the following entries:
/usr/
/usr/textfile
In this scenario, the textfile folder will be backed up twice because the Content File also has an entry for the parent folder usr.
It is recommended that Content Files avoid such duplicate entries. If you are unable to avoid duplicate entries, use the following steps to prevent the duplication of data.
Configuring Content File to Exclude Duplicate Entries
To exclude duplicate entries, on your client computer, add the OnDemand_AutoExpandDir additional setting with the value 0.
For instructions on adding the additional setting from the CommCell Console, see Add or Modify an Additional Setting.
Create an IntelliSnap Subclient
-
From the CommCell Browser, expand Client Computers > client > File System.
-
Right-click the appropriate backup set, point to All Tasks, and then click New Subclient.
-
In the Subclient Properties dialog box, specify the basic settings for the subclient:
-
In the Subclient Name box, type a name.
-
On the Content tab, click Browse toselect the directory or file that you want to back up, and then click Add.
Note: The subclient content must contain data that resides on the storage device volume. Do not include UNC paths as subclient content.
-
Click the Storage Device tab. On the Data Storage Policy subtab, from the Storage Policy list, select the appropriate storage policy.
Note: Choose a Storage Policy that does not have both the Snap and the Primary copies pointing to libraries attached to a NAS File Server.
-
-
If you use IntelliSnap, select an array.
-
Click the IntelliSnap Operations tab.
-
Select the IntelliSnap check box.
A message appears that tells you that the next backup will be a full backup.
-
Click OK.
-
From the Available Snap Engines list, select the engine that matches your snapshot type. For a list of available engines for your array, see Snapshot Engine.
-
From the Use Proxy list, select the appropriate MediaAgent.
This is the MediaAgent that is used to perform the IntelliSnap and backup copy operations.
Note:
When you perform an IntelliSnap backup using a proxy, make sure that the operating system on the proxy server is either same version or later than the operating system on the client computer.
-
Optional: If you want to perform the backup copy operations on a different MediaAgent, select the Use Separate Proxy for Backup Copy check box, and then select the appropriate MediaAgent from the Proxy list.
Notes:
-
When performing IntelliSnap backup for Windows MSCS Cluster, a separate proxy server (external to the cluster nodes) must be used for mount, backup. and restore operations, as disk signature conflicts might occur if these operations are performed from one of the servers in the cluster.
-
For Windows Storage Spaces, consider the following:
-
To use a storage pool in Commvault, use a proxy computer to perform snapshot backup, backup copy, and restore jobs
-
The operating system of the proxy computer must be of the same or later version than the operating system of the source client computer.
-
-
Creating a Subclient to Back Up Specific Files
You can create an user defined subclient to manage and back up specific data files.
-
From the CommCell Browser, navigate to Client Computers | <Client> | File System | Backup Set.
-
Right-click the Backup Set, point to All Tasks and then click New Subclient.
-
In the Subclient Name box, type a name.
-
Click the Storage Device tab.
-
In the Storage Policy list, click a storage policy name.
-
Click the Content tab.
-
Click Browse.
-
Select the directory or file to be backed up and click Add.
Repeat this step to include all the files and directories to be backed up.
You can also select Add Paths to enter the paths of the directories or files to be backed up.
-
Click Close.
-
Click OK.
You can use wildcard characters to define patterns for subclient content and filters. If the subclient content consists of wildcard characters and no eligible files are found for backup, then the backup operation will complete successfully even though no files were backed up.
The following table describes how to use wildcard characters when you define the subclient content or filters:
|
Wildcard Character |
Description |
Examples |
|---|---|---|
|
* |
Matches any number of characters. Used to match all objects This wildcard is used in following scenarios:
|
*.doc backs up all files with the extension .doc (e.g., status.doc, mission.doc) on all drives on the client computer. C:\Test\*.doc backs up all .doc files only in the C:\Test\directory. a*.dll backs up all files with the extension .dll (e.g., alsvc.dll, advdcc.dll) on the client computer thar has the name beginning with the letter "a". C:\Finance\Test\* backs up only the files in the Test folder under the Finance folder on the C: drive. Any sub-folder under the Test folder will not be backed up. |
|
** |
Matches any directory level |
C:\**\move.cpp - includes the file named move.cpp located at any directory level under the C: drive. (e.g., c:\info\com\move.cpp) C:\sys*\** - includes all folders and files under C: drive that start with sys. All the sub-folders and files under these folders are also included in the backup. |
|
? |
Matches any one character Used to match all files (or folders) for which any one character in the file name or the folder name is a variable. |
access? backs up any folder or file on the C: drive for which the name begins with- access followed by any one character such as access1 or access5. However, access12 or access15, for example, will not be backed up because the last two characters in the name are variables. To back up access12 or access15, you must specify access?? in the subclient content. Class?report backs up any folder or file for which the wildcard character in the place of ? is a variable. For example: Class1report and Class2report are included in the backup. However, Class15report is excluded from backup. |
|
[ ] |
Matches a set or range of characters enclosed in square brackets. |
Numbers within square brackets are treated as single digits, and a dash between two digits indicates the complete range of numbers between those two digits. For example, test[1-5].txt backs up all files test1.txt, test2.txt, test3.txt, test4.txt, and test5.txt. test1[0-9][0-9][0-9].txt backs up all files starting from test1000.txt to test1999.txt. To back up files test 10 to test 39, enter test[1-3][0-9]. If you enter [10-39], it would back up test1, test0, test3, and test9. If you want to treat [] as literal characters and not as wildcards, you must use the special syntax. This is useful when you want to include a file that has brackets ( [] ) in the file name. The special syntax allows you to define an escape character. Each character immediately follows the escape character is treated literally and not as a wildcard character. For example, you want to back up a file with the name report[finance].doc on the C: drive. To avoid treating the square brackets as wildcard characters, you must define the escape character. In the following example, "e=" syntax is used to define the escape character as the apostrophe (‘). The square brackets must be treated as literals and must be preceded by apostrophes. The content entry in the subclient should look like this: <P:e='>C:\report'[finance'].doc Any character can be used as the escape character, as long as it is defined after the “e=” in the syntax and it precedes any character that is to be treated as a literal. In addition, the escape character can itself be used as a literal. This can be achieved by prefixing it with another escape character.
|
|
[ ! ] |
Matches any single character that is not in the listed set or range of characters. You can use the wildcard in following scenario: Backs up all files in a directory except the files for which the name starts with any character from the specified set or range of characters. |
C:\Windows\[!AEIOU]*.doc would backup all .doc files in the C:\Windows directory that start with a letter other than A, E, I, O, or U. |
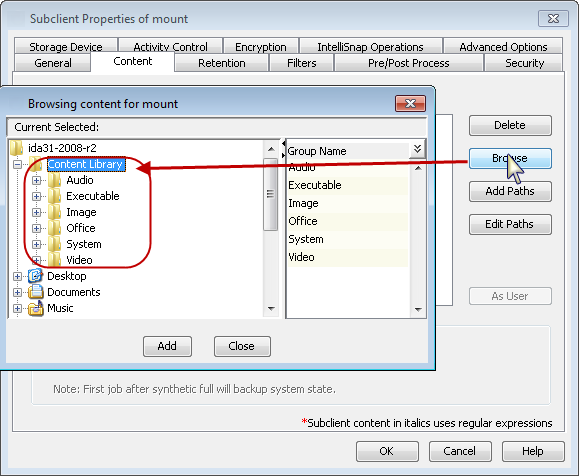
Creating a Subclient to Back Up Predefined Content
The Content Library folder on any client will automatically collect frequently accessed data such as images, audio and video. You can select the required content category under the Content Library and add to the subclient content. The following predefined content categories are available:
-
Audio
-
Executable
-
Image
-
Office
-
System
-
Video
Use the following steps create a subclient to backup predefined content:
-
From the CommCell Browser, navigate to Client Computers | <Client> | File System | Backup Set.
-
Right-click the Backup Set, point to All Tasks and then click New Subclient.
-
In the Subclient Name box, type a name.
-
Click the Storage Device tab.
-
In the Storage Policy list, click a storage policy name.
-
Click the Content tab.
-
Click Browse.
-
Navigate to <Client> | Content Library.
-
Click the desired file type.
For example, click Audio to select all the audio files on a client.
-
Click OK.
Configuring Backup of Communication Server
You can use the File System iDataAgent to backup and restore the data on the Communication Servers. If the communication server is setup across multiple computers, you must install Windows File System iDataAgent on all computers.
|
Server |
What Gets Backed Up |
What Does Not Get Backed Up |
|
Live Communications Server Office Communication Server (OCS) |
OCS data and settings |
OCS Metadata |
|
Lync Frontend Server Lync Backend Server Lync Archiving Server Lync Monitoring Server |
Lync data and settings |
Lync Metadata Response Group Configuration Lync Metadata Lync Archiving Database Lync Monitoring Database Use SQL Server Agent to backup and restore these databases. For performing backup and restore of these databases refer to: |
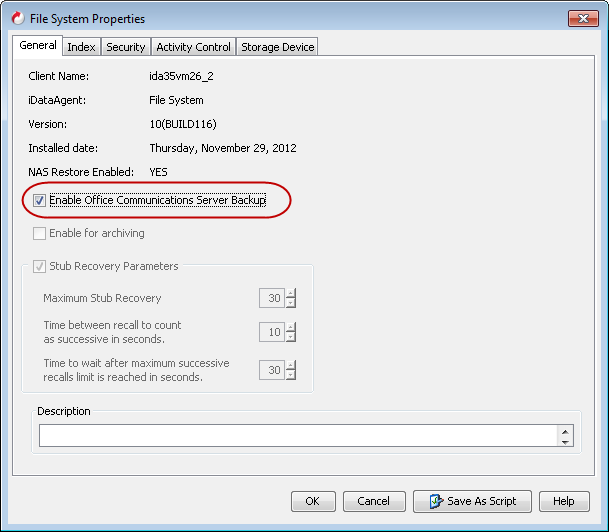
Enabling Communication Server Backup
Follow the steps given below to enable communication server backup using the Windows File System iDataAgent:
-
From the CommCell Console, navigate to Client Computers.
-
Right-click the File System and select Properties.
-
In the General tab of the File System Properties dialog box, select the Enable Office Communication ServerBackup check box.
-
Click OK.
If the communication server is setup across multiple computers, enable communication server backup on all computers.
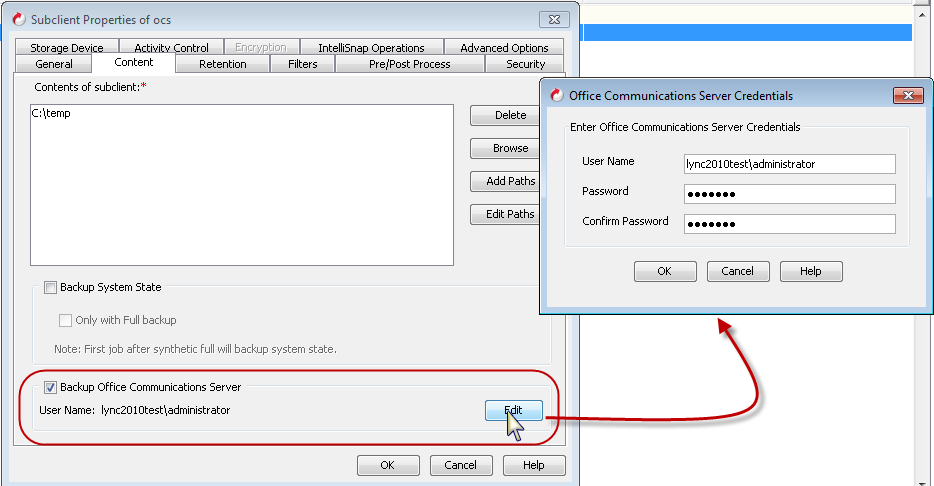
Configuring a Subclient for Communication Server
You can configure a default or a user defined subclient for OCS and Lync server. Follow the steps given below to configure a subclient for communication server:
-
From the CommCell Console, navigate to Client Computers | File System | <Backup Set>.
-
Right-click the subclient in the right paneand select Properties.
-
In the Subclient Properties dialog box, click Content.
-
Select the Backup Office Communication Server check box.
The OCS or Lync Server credentials are displayed. If they are incorrect, click Edit to change the credentials.
Enter the User Name and Password for OCSor Lync Server and click OK. The user must have read permissions on the Lync server.
-
Click OK on the Subclient Properties dialog box.
Configuring Filters for Backups
Filters are used to exclude specific types of files from being backed up. Filters can also be used to exclude certain system-related files and database application files which consistently fail during a backup operation and are not integral to the operation of the system or application.
Filtering Files from a Backup
Subclient-level backup filters are available to exclude specified directories and files from being backed up.
Subclient-level filters are applied on the backup copy and are not applied on the snapshot.
About this Task
-
You can use wildcards to filter files or folders with a pattern. For information on using wildcards, see Wildcards for Windows File System.
Note
Do not use wildcard filters if you selected the Use Proxy Option on the IntelliSnap Operations tab of the Subclient Properties dialog box.
-
You can use regular expressions to filter files or folders. For more information, see Content, Filters, and Regular Expressions.
Procedure
-
From the CommCell Browser, expand Client Computers > client > File System > backup_set.
-
Right-click the subclient and then click Properties.
-
In the Subclient Properties dialog box, specify the following selections:
-
In the Subclient name box, type the name of the subclient.
-
On the Content tab, add the content to be backed up.
-
On the Filters tab, under Exclude these files/folders/patterns, click Browse.
Optional: Click Add under Exclude these files/folders/patterns and type the path to files and folders that you want to exclude.
-
On the Storage Device tab, in the Storage Policy list, click a storage policy name. To create a new storage policy, click Create Storage Policy and follow the instructions in the storage policy creation wizard.
-
Click OK.
-
Result
When you run a backup job, the file or folder added is excluded from the backup.
Examples
|
To Filter... |
Use... |
|---|---|
|
All directories that begin with a particular word, for example My_Filter |
|
|
Fixed USB disks |
<SF,UsbConnectedDrives>**\* |
|
a particular folder and the contained subfolders and files on a particular drive |
|
|
all content that contains a special character |
|
|
System Protected Files |
<BIF,-SystemProtectedFiles> to disable the SystemProtectedFiles filter. You can disable the SystemProtectedFiles filter by adding the <BIF,-SystemProtectedFiles> entry in the subclient content or to the subclient's filter. |
|
Temporary files |
|
|
Temporary directories |
|
Configuring Exceptions to Filters
You can add exceptions to filters. The files or folders added to the exception list are included in the next backup job.
For example, if you filter a folder from a backup, but you want to back up a particular file in that folder, you can add the file as an exception to the filter.
About this Task
You can use wildcards to define exceptions to filters. The wildcards available for defining content of a subclient can be used for defining exceptions to filters.
For information on using wildcards, see Wildcards for Windows File System.
Procedure
-
From the CommCell Browser, expand Client Computers > client > File System > backup_set.
-
Right-click theSubclient and click Properties.
-
In the Subclient Properties dialog box, specify the following selections:
-
In the Subclient name box, type the name of the subclient.
-
On the Content tab, add the content to be backed up.
-
Click the Filters tab.
-
On the Filters tab, under Except for these files/folders/patterns, click Browse.
-
Click the file, folder, or directory that you want to include in the backups and then click Add.
Otherwise, click Add and enter the paths of the directories or files which you want to backup.
-
Click OK.
-
On the Storage Device tab, in the Storage Policy list, click a storage policy name. To create a new storage policy, click Create Storage Policy and follow the instructions in the storage policy creation wizard.
-
Click OK.
-
Result
When you run a backup job, the file or folder added under Except for these files/folders/patterns is backed up.
Example
All the files within the C:\User folder are backed up. On the Filters tab under Exclude these files/folders/patterns, you add the asterisk (*) wildcard. The asterisk (*)wildcard filters all folders, subfolders and files within the User folder. When a backup runs, no files are backed up.
You now add the following under Except for these files/folders/patterns:
-
[!~]*.7z
-
[!~]*.7-zip
When a backup runs, all files within the User folder that start with tilde (~) and have .7z and .7-zip extensions are not included in the backup job.
However, all files that have .7z and .7-zip extensions and do not begin with tilde (~) are included in the backup.
Excluding CommCell Console Directories
You can use thenFilterGalaxyDirectories additional setting to exclude any of these directories from a backup operation.
About this Task
You can filter the following Commvault directories:
-
Software Installation directory
-
Index Cache directory
-
Job Control directory
-
Job Results directory
Procedure
-
From the CommCell Browser, expand Client Computers.
-
Right-click the client and click Properties.
-
In the Client Computer Properties dialog box, click Advanced.
-
In the Advanced Client Properties dialog box, click the Additional Settings tab.
-
On the Additional Settings tab, click Add.
The Add Additional Settings dialog box appears.
-
In the Name box, type nFilterGalaxyDirectories.
-
The Category and Type details populate automatically.
-
In the Value box, type 1.
-
Click OK.
-
Click OK.
Result
When you run a backup, the CommCell Console Directories are not backed up.
Deleting a Filter
You can use thenFilterGalaxyDirectories additional setting to exclude any of these directories from a backup operation.
About this Task
You can filter the following Commvault directories:
-
Software Installation directory
-
Index Cache directory
-
Job Control directory
-
Job Results directory
Procedure
-
From the CommCell Browser, expand Client Computers.
-
Right-click the client and click Properties.
-
In the Client Computer Properties dialog box, click Advanced.
-
In the Advanced Client Properties dialog box, click the Additional Settings tab.
-
On the Additional Settings tab, click Add.
The Add Additional Settings dialog box appears.
-
In the Name box, type nFilterGalaxyDirectories.
-
The Category and Type details populate automatically.
-
In the Value box, type 1.
-
Click OK.
-
Click OK.
Result
When you run a backup, the CommCell Console Directories are not backed up.
Filtering Temporary Files from Backup
The Temporary Files folder automatically filters some temporary internet files, backup files, and recycle bin files. You can choose to filter these temporary files from your backup.
About this Task
-
You can filter the following temporary files:
-
**\.DS_Store
-
**\thumbs.db
-
<SF,RecycleBin *>
-
<WKF,LocalAppData>\Temp
-
<WKF,TemporaryInternetFiles>
-
~$*
-
-
You can use regular expressions to filter files or folders. For more information, see Content, Filters, and Regular Expressions.
Procedure
-
From the CommCell Browser, expand Client Computers > client > File System > backup_set.
-
Right-click the subclient and click Properties.
-
In the Subclient Properties dialog box, specify the following selections:
-
In the Subclient name box, type the name of the subclient.
-
On the Content tab, add the content to be backed up.
-
Click the Filters tab.
-
On the Filters tab, click Browse.
-
Go to Client > Temporary Files.
-
In the File Extension list, click the file type you want to filter from your backup.
For example, click ~$* to select all the temporary files stored on the client computer.
-
Click Add and thenclick OK.
-
On the Storage Device tab, in the Storage Policy list, click a storage policy name. To create a new storage policy, click Create Storage Policy and follow the instructions in the storage policy creation wizard.
-
Click OK.
-
Result
When you run a backup, the temporary files are excluded from the backup.
Browse or Search Based on End-User Access Control
During backups, the metadata information associated with the files is collected, stored in the backup index and is available for search/browse. By default, end-users can browse and search all the data backed up from a common resource like a shared laptop or file server. You can control the end-user access on such common resources by enabling access control on the client data.
When you enable access control on client data, the access control lists (ACLs) for the data are also included in the backup, which in turn, allow users to access only the files and folders for which they have access permissions. Other files and folders for which the user does not have permissions will be filtered and hidden during Find, Browse, Restore, and Delete Data operations.
Remember: This option is only available for users who log in with their Active Directory credentials.
Before You Begin
-
To view the user data, assign End User Access permission to the client owners of the particular client computer. For instructions, see Configuring End-User Operations on Client Computers.
Assigning the End User Access permission helps maintain multiple user profiles on the same laptop (or desktop) and ensures that each user has the ability to access only the data for which the user has access permissions.
Also, remove any existing Browse permissions for the client owners.
-
By default, you can access data backed up by the defaultBackupSet on the Web Console. To browse user data backed up only by the default subclient on the Web Console, you must disable browse for non-default subclients. For instructions, see Disabling Data Browse from Non-Default Subclients.
To enable browse or search based on end-user access control, complete the following steps:
-
From the CommCell Browser, expand Client Computers >Client > File System > Backup Set.
-
Right-click the subclient and click Properties.
-
In the Subclient Properties dialog box, click Advanced.
-
In the Advanced Subclient Properties dialog box, click the Advanced Options tab, and select Catalog ACL (end user access control list).
-
Click OK.
-
Click OK.
After enabling access control, run a full backup on the subclient to include the ACLs in the backup data. Conversely, if you run a differential or incremental backup, only the newer data will include the ACLs.
Configuring Multiple Streams for Backups
File System Multi-Streaming employs multiple data streams per subclient for data protection operations. This enables the subclient's contents to be distributed to all the streams, transmitting them in parallel to the storage media. Hence a subclient whose data is secured using three data streams, utilizes more of the available network resources, and can complete in as little as one third the time that the same data would require using a single stream.
Note that, you do not have to enable multi-streaming if you have multiple mount points pointing to the same physical drive.
Before enabling multi streaming, ensure that you can use multi-streaming when you restore the data and create an auxiliary copy. Restores by jobs use the same number of streams that you configure for the subclient. For more information on restoring by jobs, see Restore by Jobs.
-
Follow the steps given below to configure multi-streaming.From the CommCell Browser, expand Client Computers > client > File System > backup_set.
-
Right-click the appropriate subclient and click Properties.
The Subclient Properties dialog box is displayed.
-
On the General tab, in the Subclient Name box, type the name of the subclient.
-
On the Content tab, add the content to be backed up.
-
On the Storage Device tab, in the Storage Policy list, click a storage policy name to associate with the subclient.
Tip: To create a new storage policy, click Create Storage Policy and follow the instructions in the storage policy creation wizard.
-
Click Advanced.
The Advanced Subclient Properties dialog box is displayed.
-
On the Performance tab, specify the number of data streams:
-
In the Number of Data Readers box, enter the number of data streams.
Note: The value for Number of Data Readers should be equal to or less than the number of streams in the storage policy you selected.
-
Select the Allow multiple data readers within a drive or mount point check box.
-
Click OK to close the Advanced Subclient Properties dialog box.
-
-
Click OK.
Configuring Pre-processing and Post-processing for Backups
Setting Up Pre-processes and Post-processes
You can add and modify Pre-processes and Post-processes for a subclient. These are batch files or shell scripts that you can run before or after certain job phases. For example, you can use an echo command to check the level of a backup. Similarly, you can include a case statement within a script to run specific operations based on the level of the backup job.
A Save As Script file can also be run as a pre-process and post-process, if you include the absolute path of the associated input file in the script file.
See Pre-processes and Post-processes - Commands and Arguments for information on additional arguments that the CommServe sends to the Pre-processes and Post-processes.
-
From the CommCell Browser, expand Client Computers > client > File System > backup_set.
-
Right-click the appropriate subclient and click Properties.
-
In the Subclient Properties dialog box, specify the basic settings for the subclient:
-
In the Subclient name box, type the name of the subclient.
-
On the Content tab, add the content to be backed up.
-
Click Advanced.
-
-
In the Advanced Subclient Properties dialog box, click the Pre/Post Process tab.
-
Depending on the process you want to set up, click the corresponding Browse button and select the required process.
-
Click OK.
-
Click OK.
Setting Up Post-processes to Run during Failures
By default, a specified post-process command is executed only on successful completion of the scan or backup operation or if the job is killed.
Use the following steps to run a post-process even if the scan or backup operation did not complete successfully. For example, this may be useful to bring a database online or release a snapshot.
-
rom the CommCell Browser, expand Client Computers > client > File System > backup_set.
-
Right-click the appropriate subclient and click Properties.
-
In the Subclient Properties dialog box, specify the basic settings for the subclient:
-
In the Subclient name box, type the name of the subclient.
-
On the Content tab, add the content to be backed up.
-
Click Advanced.
-
-
In the Advanced Subclient Properties dialog box, click the Pre/Post Process tab.
-
Select the Run Post Scan Process for all attempts check box.
-
Select the Run Post Backup Process for all attempts check box.
-
Click OK.
Configuring User Accounts
Users performing backups must be either an administrator or a backup operator. Backup operators (or Service Users) are designed to have full control to the registry and the installation folder.
|
Role |
Privileges |
|
An administrator or a backup operator in a local group |
Able to back up any file and folder on the local computer to which the local group applies. |
|
An administrator or backup operator on a domain controller |
Able to back up any file and folder on:
|
If you are not an administrator or backup operator, you must be the owner of the files and folders you want to back up or have one or more of the following permissions.
-
Read
-
Read and execute
-
Modify
-
Full Control
The following sections describe the procedures for modifying user permissions and rights.
Users can be configured at the server and domain control levels to perform backups using the following procedures:
Configuring Windows Users on an Individual Server
-
Go to Control Panel > Administrative Tools.
-
Double-click Computer Management.
-
On the Computer Management browser, expand Local User and Groups > Users.
-
Right-click the user who will perform backups and click Properties.
-
On the Member Of tab, click Add to add the Backup Operators group to the User.
-
Click OK.
-
Log off and log on to the computer as an Administrator for the policies to take effect.
Configuring Windows Users on a Domain Controller
To add a user to the Backup Operators Group, perform the following steps on the domain controller:
-
Create or prepare to manage a Windows user who will run the services.
-
Navigate to Active Directory Users | Computers | Users.
-
Right-click the user who will be performing backups and click Member of.
-
Add the Backup Operators group to the User.
-
Click OK.
-
Log off and log in as the domain controller Administrator for the policies to take effect.
Configuring Windows Users for Specific Folders
-
Right-click the folder you want to back up and click Properties.
-
On the Security tab, enable Add Backup Operators with full control rights.
Configuring Credentials for Restricted Drives or Directories
You can define a user or an account with permissions to restore data to either mapped/shared network drives or directories to which you have no write privileges.
-
From the CommCell Browser, right-click File System, click All Tasks, and then click Browse and Restore.
-
From the Restore Options dialog box, click Advanced.
-
Select Impersonate Windows User.
-
Enter the appropriate user name and password.
-
Click OK to save the settings.
Configuring Retention for Deleted Items
Subclient retention settings determine which files remain in the backup content. Subclient retention is managed by synthetic full backups.
You can specify the time period for which you want to retain the deleted files in the backup cycle. This enables you to restore the deleted files from the latest backup cycle and avoid point-in-time restores. This is useful to view (and restore) the deleted files from clients (like, laptop clients) that have backup cycles with frequent & numerous incremental backups after a full backup.
By default, when you delete any files from the source, they will be removed from the backup cycle during the next backup. You can specify the retention period for each subclient. When you run the synthetic full backup at the end of specified retention period, the deleted files will be removed from the backup cycle.
However, if a full backup is performed during the retention period, the deleted files may get removed from the backup cycle earlier. For more information about removing deleted files from the backup cycle, see Data Aging.
About this Task
-
Files that are moved from one subclient to another are also considered as deleted files and the subclient retention settings apply to those files as well.
-
You can also set retention for storage policy. The retention criteria set at the storage policy level takes a higher precedence over the one set at the subclient level.
Procedure
-
From the CommCell Browser, expand Client Computers > client > Agent > backup_set.
-
Right-click the Subclient and click Properties.
-
In the Subclient Properties dialog box, specify the following selections:
-
In the Subclient name box, type the name of the subclient.
-
On the Content tab, add the content to be backed up.
-
Click Advanced.
-
-
In the Advanced Subclient Properties dialog box, to retain or drop the deleted files during synthetic full backup, choose one of the following options:
Options
Description
Immediately
Drops the deleted or moved files during synthetic full backup.
After n days
Retains the deleted or moved files for n number of days. The n days for a deleted or moved file starts from the date the next incremental backup runs after the file was deleted.
Never
Retains the deleted or moved file in the backup cycle forever.
-
Click OK.
-
On the Storage Device tab, in the Storage Policy list, click a storage policy name. To create a new storage policy, click Create Storage Policy and follow the instructions in the storage policy creation wizard.
-
Click OK.
From the Command Line Interface
Optionally, you can set the retention criteria using the command line interface as follows:
-
Open the command prompt and go to installation_path\Base directory.
-
Enter the QLogin.exe and type your user name and password.
-
Execute one of the following commands based on your requirement:
-
To set the subclient retention to Immediately, execute the following command:
qoperation execscript -sn SetRetentionForUserDeletedItems.sql -si '<ClientGroupName>' -si 'Immediately' -
To set the subclient retention to After n days, execute the following command:
qoperation execscript -sn SetRetentionForUserDeletedItems.sql -si '<ClientGroupName>' -si 'Days' -si '<number_of_days>'For example, to set the subclient retention to After 14 days, execute the following:
qoperation execscript -sn SetRetentionForUserDeletedItems.sql -si '<ClientGroupName>' -si 'Days' -si '14' -
To set the subclient retention to Never, execute the following command:
qoperation execscript -sn SetRetentionForUserDeletedItems.sql -si '<ClientGroupName>' -si 'Never'
-
Configuring Catalog Backup Job Progress Status
You can configure how often a catalog backup job progress status is saved, or updated before it gets saved.
Modifying the Update Frequency of Catalog Backup Job State
The catalog backup job state updates occur after the progress through the collect file crosses preset thresholds. By using an additional setting, you can configure the backup job state updates to occur after every n files in the collect file. Configuring a lower value for the additional setting might adversely affect the backup performance.
Procedure
-
From the CommCell Browser, right-click client and then click Properties.
-
In the Client Properties dialog box, click the Additional Settings tab and then click Add.
-
In the Add Additional Settings dialog box, enter the details for the additional setting:
-
In the Name box, type nCatalogRestartCommitInterval.
-
In the Category box, select FileSystemAgent.
-
In the Type box, select Integer.
-
In the Value box, type 100 to set the updates to occur after every 100 files.
-
Click OK.
-
-
In the Client Properties dialog box, click OK.
Configuring File Level Information for a Subclient
File Level Analytics provides granular file level details of files in the backup. The granular details include information like:
-
The name and location of each file.
-
The size of each file.
-
The time at which it was last modified.
-
The time at which the file was last accessed. To update the Last Access Time attribute of files accurately, see Track Last Access Time.
-
The time at which the file was created.
-
The name of the primary user of the file.
-
The name of the primary user group of the file.
For detailed information on File Level Analytics see, File Level Analytics documentation.
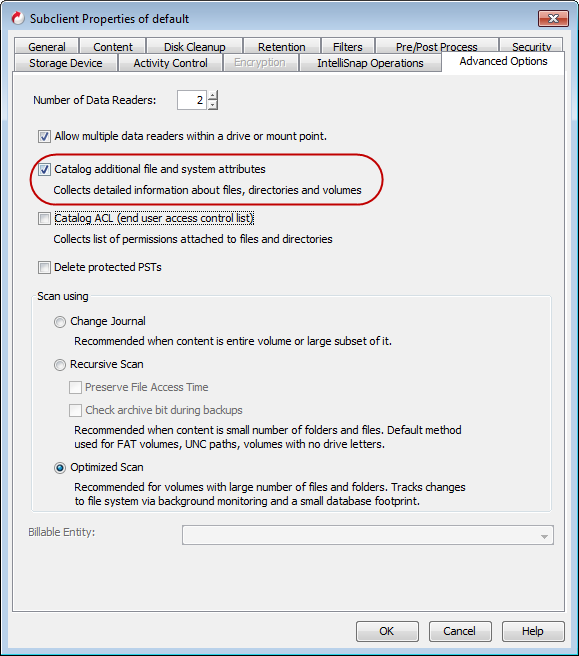
Enable this option at the subclient level before performing a backup to collect information about files, volumes, and directories within the subclient being backed up.
Follow the steps given below to enable this option:
-
From the CommCell Browser, navigate to Client Computers |<Client> | File System | <backupset>.
-
Right-click the <Subclient> in the right pane and click Properties.
-
Click the Advanced Options tab and select Catalog additional file and system attributes.
-
Click OK.
Managing Encryption Pass-Phrase
The Pass-Phrase feature is deprecated. For similar functionality, use Privacy.
See End-of-Life, Deprecated and Extended Support - Features for comprehensive information on deprecated features.
Data encryption for backups can be enabled with a pass-phrase, which would be required for restoring the data. The following sections describes the various operations related to the pass-phrase.
Setup Encryption Pass-Phrase
Data encryption keys can be protected with a pass-phrase before being stored in the database. The pass-phrase will be required for restoring the data.
If the database is accessed by unauthorized users, and the media is stolen, the data will still not be recoverable without the pass-phrase.
Use the following steps to enable the encryption pass-phrase:
-
From the CommCell Console, right-click the Client and click Properties.
-
From the Client Computer Properties for <client> dialog box, click Advanced button.
-
From the Advanced Client Properties dialog box, select the following:
-
Click the Encryption tab.
-
Click the Encrypt Data check box.
-
In the Cipher box, select the encryption algorithm.
-
In the Key Length box, select a key length.
-
From the Direct Media Access (External Restore Tools) area, click either the Via Pass-Phrase or the No Access option.
-
From the Restore Access area, click the With a Pass Phrase option.
A Warning message will be displayed. Click OK.
-
In the Enter Pass-Phrase dialog box, specify the Pass-Phrase and click OK.
-
Click OK to close the Advanced Client Properties dialog box.
-
-
Click OK to close the Client Computer Properties for <client> dialog box.
Export an Encryption Pass-Phrase
You can export the file containing the scrambled pass-phrase. This is useful for restore operations, especially scheduled restores, to complete successfully.
A <hostname>.pf file is copied to the <software installation path>\PF folders and is named for the source client.
Exporting the pass-phrase will also facilitate immediate restores, bypassing the need to enter the pass-phrase for each restore operation.
When using pass-phrase security for:
-
Migration Archiver Agents - you must export the pass-phrase to the destination client before you can run a Stub data recovery.
-
Image Level iDataAgents - you must export the pass-phrase to the MediaAgent as well as the destination client, since a portion of the volume information is restored to the MediaAgent Index Cache. When using Alternate Data Paths (GridStor), this would apply to any MediaAgent involved in the restore.
-
From the CommCell Console, right-click the Client and click Properties.
-
From the Client Computer Properties for <client> dialog box, click Advanced button.
-
From the Advanced Client Properties dialog box, select the following:
-
Click the Encryption tab.
-
Click the Export button.
-
In the Destination Computer, select the name of the destination client.
-
Enter the pass-phrase and click Export.
-
-
Click OK to close the Advanced Client Properties dialog box.
-
Click OK to close the Client Computer Properties for <client> dialog box.
Reset a Pass-Phrase
Pass phrases can be changed using the reset option.
When a pass-phrase is reset, it can be used to recover data - both from the current and past backups. For example, if you ran a few encrypted backups with the pass-phrase set to “violet”, and then changed the pass-phrase to “purple”, you will need to enter “purple” when recovering that data. It works like this because pass-phrase is used to lock encryption keys rather than encrypt the data itself. When pass-phrase is modified, the keys are re-locked with the new pass-phrase.
-
From the CommCell Console, right-click the Client and click Properties.
-
From the Client Computer Properties for <client> dialog box, click Advanced button.
-
From the Advanced Client Properties dialog box, select the following:
-
Click the Encryption tab.
-
Click the Reset button.
-
Enter the old and new pass-phrase and then click the Reset button.
-
-
Click OK to close the Advanced Client Properties dialog box.
-
Click OK to close the Client Computer Properties for <client> dialog box.
Setup the Pass-Phrase for Synthetic Full Backups
Explicitly enabling synthetic full backups in the CommCell Console will create a copy of unlocked encryption keys in the database, which will be accessible only to synthetic full backup operations. In this case the regular restore operations will continue to prompt for a pass-phrase, but synthetic backups will not prompt for the pass-phrase.
-
From the CommCell Console, right-click the Client and click Properties.
-
From the Client Computer Properties for <client> dialog box, click Advanced button.
-
From the Advanced Client Properties dialog box, select the following:
-
Click the Encryption tab.
-
Click the Encrypt Data check box.
-
In the Cipher box, select the encryption algorithm.
-
In the Key Length box, select a key length.
-
From the Direct Media Access (External Restore Tools) area, click either the Via Pass-Phrase or the No Access option.
-
From the Restore Access area, click the With a Pass Phrase option.
A Warning message will be displayed. Click OK.
-
Click the Enable Synthetic Full check box.
-
In the Enter Pass-Phrase dialog box, specify the Pass-Phrase and click OK.
-
Click OK to close the Advanced Client Properties dialog box.
-
-
Click OK to close the Client Computer Properties for <client> dialog box.
Modifying an Agent, Backup Set or Subclient
The following table describes the properties that can configured from the agent, backup set and subclient levels.
|
Option |
Description |
Related Topics |
|
Preserving the File Access Time |
This option allows you to prevent the file access time from being changed as a result of running data protection operations on the client. When this option is selected, the file access time will be preserved.
|
|
|
Change Storage Policies |
You can modify the storage policies in any of the following situations:
You can change the storage policies from the subclient level.
|
Refer to Storage Policies. |
|
Rename a Backup Set or Subclient |
You can rename backup sets and subclients. Renaming BackupSet:
Renaming subclient:
|
|
|
Data Transfer Options |
You can efficiently configure the available resources for transferring data secured by data protection operations from the subclient level. This includes the following:
You can configure the data transfer options.
|
Refer to Data Compression and Network Bandwidth Throttling. |
|
View Data Paths |
You can view the data paths associated with the primary storage policy copy of the selected storage policy or incremental storage policy. You can also modify the data paths including their priority from the subclient level.
|
|
|
Configure Activity Control |
You can enable backup and restore operations from the agent and subclient level. However, you can enable restore operations only from the agent level.
|
Refer to Activity Control. |
|
Configure User Security |
You can configure user security from the agent or subclient level. You can perform the following functions:
|
Refer to User Administration and Security. |
|
Enable or Disable Data Encryption |
When you configure encryption at the client level, it is configured automatically for all the subclients associated with all the agents installed on that client. If you want to disable or change the encryption at the subclient level, follow the steps given below:
|
Refer to Data Encryption. |
|
View Software Version and Installed Updates |
The Version tab, at the Agent level displays the software version and post-release service packs and updates installed for the component.
|
|
|
CommCell Configuration Report |
The CommCell Configuration Report provides the properties of the CommServe, MediaAgents, clients, agents, subclients, and storage policies within the CommCell based on the selected filter criteria.
|
Refer to CommCell Configuration. |
Deleting an Agent, Backup Set or Subclient
The following sections describe the steps involved in deleting an agent, archive set or subclient.
When you delete an instance or backupset, the associated data is logically deleted and you can no longer access the corresponding data from CommCell Console for recovery purposes.
Refer to the troubleshooting article on Recovering Data Associated with Deleted Clients and Storage Policies for information on how to recover data if you accidentally delete an entity.
Deleting an Agent
You need to uninstall or DeConfigure the agent software from the client computer before deleting from CommCell Browser. After you delete the client software, you can either leave the corresponding data intact for appropriate action or you can remove the data immediately. If you choose to remove the data immediately, you must delete the agent from the CommCell Browser. If you delete the agent, all of the agent's data is irretrievably lost.
-
You cannot delete an agent while operations for that agent are running.
-
From the CommCell Browser, navigate to Client Computers | <Client>.
-
Right-click the <Agent>, and then click Delete.
-
A confirmation message is displayed with the following message:
This operation will permanently delete the data backed up from this level and it cannot be restored.
-
Click OK to continue with the deletion operation or click No to abort the deletion.
Deleting a Backup Set
Consider the following before deleting a Backup Set:
-
You cannot delete a default Backup Set.
-
Schedules associated with the Backup Set are also automatically deleted.
-
From the CommCell Browser, navigate to Client Computers | <Client> | <Agent>.
-
Right-click the <Backup Set>, and then click Delete.
-
A confirmation message is displayed, asking if you want to delete the Backup Set.
Click No to cancel the deletion and retain the Backupset, or click Yes to continue the deletion.
Deleting a Subclient
Consider the following before deleting a subclient:
-
You cannot delete a default subclient.
-
Schedules associated with the subclient are also automatically deleted.
Procedure
-
From the CommCell Browser, navigate to Client Computers > virtualization_client > agent > backup_set.
-
Right-click the subclient that you want to delete, and then click Delete.
-
A confirmation message is displayed, asking if you want to delete the subclient.
Click No to cancel the deletion and retain the subclient, or click Yes to continue the deletion.